- Shop All
- Sales & Specials
- Accessories
- Body Kits
- Brakes
- Drivetrain
- Engine
- Air, Oil & Fuel Filters
- Mass Air Flow Meters/Sensors
- Alternators
- Motor Mounts
- Batteries
- Nitrous Kits
- Camshafts
- Oil Pans
- Cold Air Intakes
- Radiators, Hoses & Accessories
- Coyote Engine Conversion Parts
- Reservoirs & Tanks
- Crate Engines & Blocks
- Serpentine Belts
- Cylinder Heads & Valvetrain
- Shaker Systems
- Engine Dressup
- Superchargers
- Fender Covers
- Throttle Bodies
- Fuel Delivery
- Turbochargers
- Gaskets
- Underdrive Pulleys
- HVAC Parts
- Valves, Sensors & Sending Units
- Ignition Parts
- Water Pumps & Accessories
- Intake Manifolds & Plenums
- Exhaust
- Exterior
- Antennas
- Hoods
- Body Kits
- License Plates & Frames
- Bras
- Light Covers
- Bumper Inserts
- Lightbars & Styling Bars
- Caliper Covers & Paint
- Louvers
- Car Covers
- Mud Flaps
- Chin Spoilers
- Mirrors & Mirror Covers
- Convertible Top Parts
- Paint & Headlight Protection Film
- Decals
- Pre-painted Parts
- Decklid Panels
- Racing Stripes
- Door Handles, Covers & Bezels
- Scoops
- Emblems & Badges
- Spoilers
- Exterior Trim
- Taillight Trim/Bezels
- Fuel Doors
- Wheel Accessories
- Grilles
- Wind Deflectors
- Hood Pin Kits
- Window Tint & Light Tint
- Intake
- Interior
- Lights
- Restoration
- Suspension
- Tires
- Tuners
- Wheels
- 2010-2013
- Sales & Specials
- Accessories
- Body Kits
- Brakes
- Drivetrain
- Engine
- Air, Oil & Fuel Filters
- Mass Air Flow Meters/Sensors
- Alternators
- Motor Mounts
- Batteries
- Nitrous Kits
- Camshafts
- Radiators, Hoses & Accessories
- Cold Air Intakes
- Reservoirs & Tanks
- Cylinder Heads & Valvetrain
- Shaker Systems
- Engine Dressup
- Superchargers
- Fender Covers
- Throttle Bodies
- Fuel Delivery
- Turbochargers
- Gaskets & Seals
- Underdrive Pulleys
- HVAC Parts
- Valves, Sensors & Sending Units
- Ignition Parts
- Water Pumps & Accessories
- Intake Manifolds & Plenums
- Exhaust
- Exterior
- Antennas
- Hoods
- Bras
- License Plates & Frames
- Caliper Covers
- Light Bars & Convertible Styling Bars
- Car Covers
- Louvers
- Chin Spoilers
- Mirrors & Mirror Covers
- Convertible Top Parts
- Mud Flaps
- Decals & Stripes
- Paint & Headlight Protection Film
- Decklid Panels
- Pre-Painted Parts
- Door Handles, Covers & Bezels
- Racing Stripes
- Emblems & Badges
- Scoops
- Exterior Trim
- Spoilers & Wings
- Fuel Doors
- Taillight Trim
- Grilles
- Wheel Accessories
- Hood Pins & Kits
- Window Tint & Light Tint
- Intake
- Interior
- Lights
- Restoration
- Suspension
- Tires
- Tuners
- Wheels
- 2005-2009
- Sales & Specials
- Accessories
- Body Kits
- Brakes
- Drivetrain
- Engine
- Air, Oil & Fuel Filters
- Mass Air Flow Meters/Sensors
- Alternators
- Motor Mounts
- Batteries
- Nitrous Kits
- Camshafts
- Radiators, Hoses & Accessories
- Cold Air Intakes
- Reservoirs & Tanks
- Cylinder Heads & Valvetrain
- Shaker Systems
- Engine Dressup
- Superchargers
- Fender Covers
- Throttle Bodies
- Fuel Delivery
- Turbochargers
- Gaskets & Seals
- Underdrive Pulleys
- HVAC Parts
- Valves, Sensors & Sending Units
- Ignition Parts
- Water Pumps & Accessories
- Intake Manifolds & Plenums
- Exhaust
- Exterior
- Antennas
- Hoods
- Bras
- License Plates & Frames
- Caliper Covers
- Light Bars & Convertible Styling Bars
- Car Covers
- Louvers
- Chin Spoilers
- Mirrors & Mirror Covers
- Convertible Top Parts
- Mud Flaps
- Decals & Stripes
- Paint & Headlight Protection Film
- Decklid Panels
- Pre-Painted Parts
- Door Handles, Covers & Bezels
- Racing Stripes
- Emblems & Badges
- Scoops
- Exterior Trim
- Spoilers & Wings
- Fuel Doors
- Taillight Trim
- Grilles
- Wheel Accessories
- Hood Pins & Kits
- Window Tint & Light Tint
- Intake
- Interior
- Lights
- Restoration
- Suspension
- Tires
- Tuners
- Wheels
- 1999-2004
- Sales & Specials
- Accessories
- Body Kits
- Brakes
- Drivetrain
- Engine
- Air, Oil & Fuel Filters
- Motor Mounts
- Alternators
- Nitrous Kits
- Batteries
- Oil Pans
- Camshafts
- Radiators, Hoses & Accessories
- Cold Air Intakes
- Replacement Serpentine Belts
- Cylinder Heads & Valvetrain
- Reservoirs & Tanks
- Engine Dressup
- Shaker Systems
- Fender Covers
- Superchargers
- Fuel Delivery
- Throttle Bodies
- Gaskets & Seals
- Turbochargers
- HVAC Parts
- Underdrive Pulleys
- Ignition Parts
- Valves, Sensors & Sending Units
- Intake Manifolds & Plenums
- Water Pumps & Accessories
- Mass Air Flow Meters/Sensors
- Exhaust
- Exterior
- Antennas
- Hood Pins
- Bras
- Hoods
- Bumper Inserts
- License Plates & Frames
- Caliper Covers
- Lightbars & Styling Bars
- Car Covers
- Louvers
- Chin Spoilers
- Mirrors & Mirror Covers
- Convertible Top Parts
- Mud Flaps
- Decals
- Racing Stripes
- Decklid Panels
- Scoops
- Door Handles, Covers & Bezels
- Spoilers & Wings
- Emblems & Badges
- Taillight Trim & Bezels
- Exterior Trim
- Wheel Accessories
- Fuel Doors
- Window Tint & Light Tint
- Grilles
- Intake
- Interior
- Lights
- Restoration
- Suspension
- Tires
- Tuners
- Wheels
- 1994-1998
- Sales & Specials
- Accessories
- Body Kits
- Brakes
- Drivetrain
- Engine
- Air, Oil & Fuel Filters
- Mass Air Flow Meters/Sensors
- Alternators
- Motor Mounts
- Batteries
- Nitrous Kits
- Camshafts
- Oil Pans
- Cold Air Intakes
- Radiators, Hoses & Accessories
- Cylinder Heads & Valvetrain
- Replacement Serpentine Belts
- Engine Dressup
- Reservoirs & Tanks
- Fender Covers
- Superchargers
- Fuel Delivery
- Throttle Bodies
- Gaskets & Seals
- Turbochargers
- HVAC Parts
- Underdrive Pulleys
- Ignition Parts
- Valves, Sensors & Sending Units
- Intake Manifolds & Plenums
- Water Pumps & Accessories
- Exhaust
- Exterior
- Antennas
- Hood Pins & Kits
- Bras
- Hoods
- Bumper Inserts
- License Plates & Frames
- Caliper Covers
- Light Bars & Convertible Styling Bars
- Car Covers
- Louvers
- Chin Spoilers
- Mirrors & Mirror Covers
- Convertible Top Parts
- Racing Stripes
- Decals & Stripes
- Scoops
- Door Handles, Covers & Bezels
- Spoilers & Wings
- Emblems & Badges
- Taillight Trim & Bezels
- Exterior Trim
- Wheel Accessories
- Fuel Doors
- Window Tint & Light Tint
- Grilles
- Intake
- Interior
- Lights
- Restoration
- Suspension
- Tires
- Tuners
- Wheels
- 1979-1993
- Sales & Specials
- Accessories
- Body Kits
- Brakes
- Drivetrain
- Engine
- Air, Oil & Fuel Filters
- Mass Air Flow Meters/Sensors
- Alternators
- Motor Mounts
- Batteries
- Nitrous Kits
- Camshafts
- Oil Pans
- Cold Air Intakes
- Radiators, Hoses & Accessories
- Cylinder Heads & Valvetrain
- Replacement Serpentine Belts
- Engine Dressup
- Reservoirs & Tanks
- Fender Covers
- Superchargers
- Fuel Delivery
- Throttle Bodies
- Gaskets & Seals
- Turbochargers
- HVAC Parts
- Underdrive Pulleys
- Ignition Parts
- Valves, Sensors & Sending Units
- Intake Manifolds & Plenums
- Water Pumps & Accessories
- Exhaust
- Exterior
- Antennas
- Hood Pins & Kits
- Bumper Inserts
- Hoods
- Caliper Covers
- License Plates & Frames
- Car Covers
- Light Bars & Convertible Styling Bars
- Convertible Top Parts
- Louvers
- Decals & Stripes
- Mirrors & Mirror Covers
- Door Handles, Covers & Bezels
- Racing Stripes
- Emblems & Badges
- Spoilers & Wings
- Exterior Trim
- Wheel Accessories
- Grilles
- Intake
- Interior
- Lights
- Restoration
- Suspension
- Tires
- Tuners
- Wheels
2005-2009 Mustang Flush-Mount Quarter Window Louver Installation Guide
This Mustang Parts Installation Guide Works For
| Tools Required
Installation Time: 4 Hrs |
Installation
- With the key in the on position, lower the front windows to the down position. Turn key to the off position and remove from ignition, making sure vehicle is in park / neutral and the parking brake is set. This step is important to insure the new seal dries properly at the end of the installation. Move front seats forward for room to work in back.
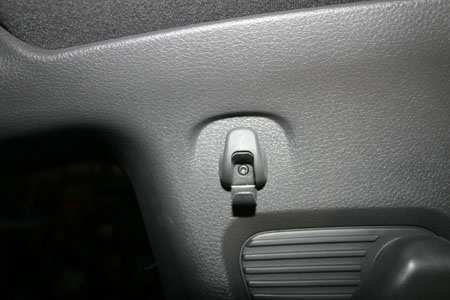
- Using a small pick tool, open the coat hook cover and remove it using the T-20 Torx bit.
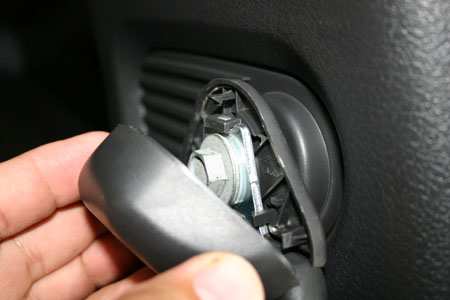
- The top seat belt bolt is next. Remove the cover cap first.
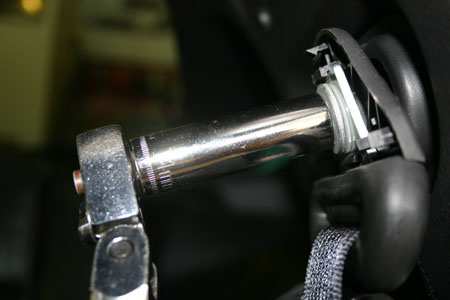
- After removing the cover cap, the bolt can be removed with a 14mm socket.
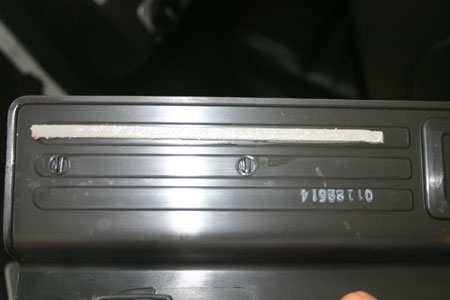
- Remove the door sill plate on at least the back edge of the door jamb. This is held in with retaining clips and small strips of double-sided adhesive. Care in pulling this cleanly will insure that the tape will be able to be re-used. If it is damaged in this step, or if you would like, new tape can be purchased at most auto parts stores. We recommend 3M VHB tape for this.
- A close-up of one of the VHB tape strips:
- Remove the lower rear seat cushion. This is held in place by two push clips. To remove, push slightly down and back on the front of the rear seat lower cushion at the same time. As you push back, start to lift the cushion. When it is pushed back sufficiently, it will lift up rather easily. Remove from the vehicle.
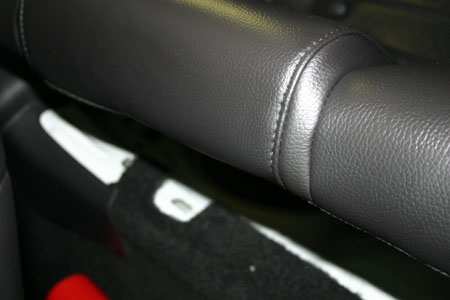
- Rear seat lower cushion push-clip close-up.
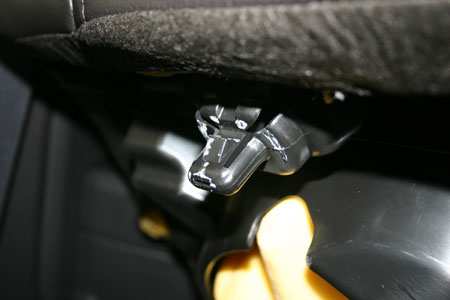
- The roof pillar / A-pillar cover needs to be moved for clearance or removed entirely so that the rear quarter panel trim panel can be removed. It is retained by push-clips on the backside.
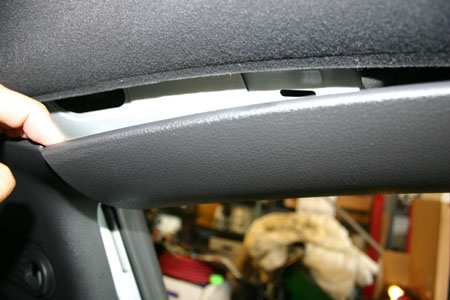
- Fold down the top section of the rear seats to expose the push-pin clips holding the interior quarter panels in place (lower). Remove these clips with a trim removal tool. After removing push-pins, the remainder of the panel will “snap”out. The seat belt must be routed through the panel as it is removed, and the panel must be “walked” off of the quarter panel weld seam at the door jamb.
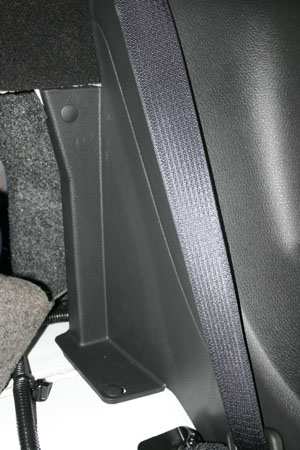
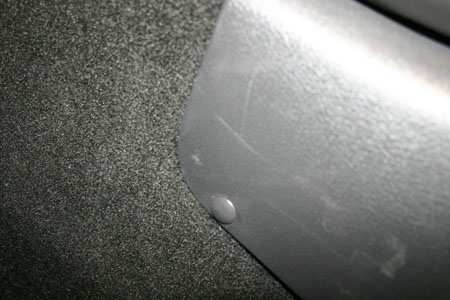
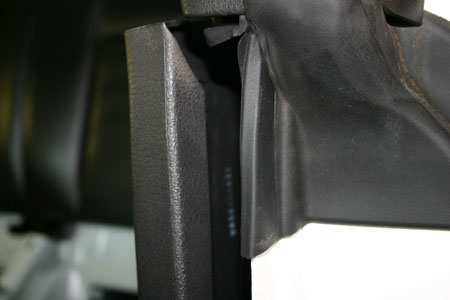
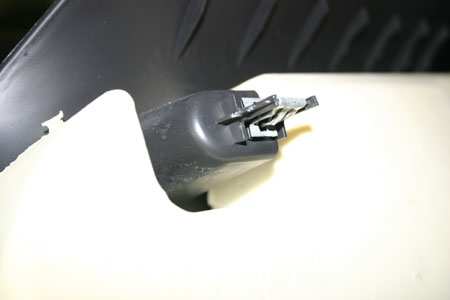
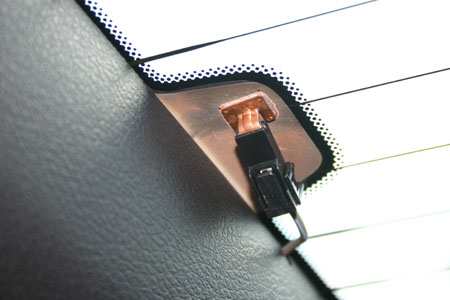
- Note two of the slots for the retaining clips visible in this photo of the upper quarter panel trim piece after it is removed. Remove defroster wiring prior to removal of this upper panel.
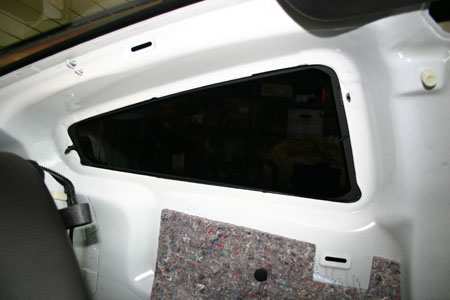
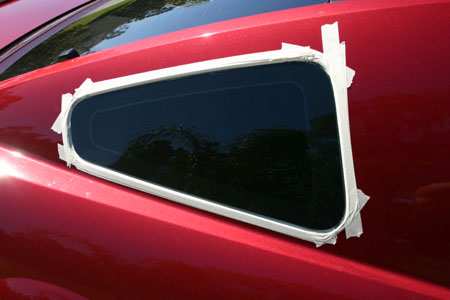
- On the outside of the vehicle, a protective tape mask needs to be placed around the edge of the quarter window being removed. Use a good quality masking tape, and put down at least two layers, rolling around the body seam leading into the window pocket. This tape is to protect the paint from accidental rubbing of the cutting wire in the following steps, but will not protect against careless use of the cutting wire.
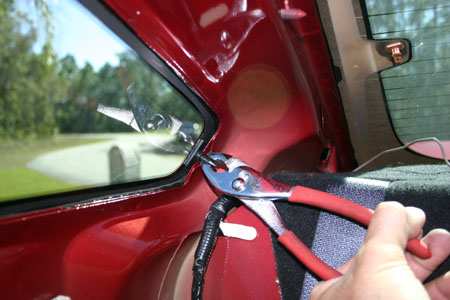
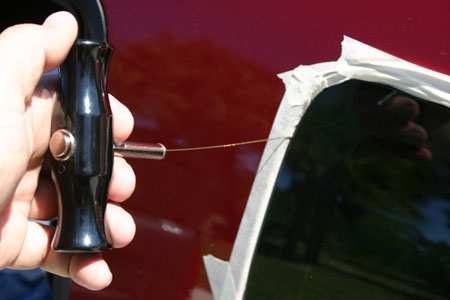
- The window is retained by urethane adhesive sealant and two locating pins used at the factory to hold the window in place as it dries. The locating pins are not included on OEM replacement glass or on the replacement louver kit. These pins can be removed and discarded to aid in the glass removal process or left in place. Start the removal process by carefully feeding the cutting wire through the seal near one of the pins using the piecing tool that is part of the windshield removal kit. A length of about 16-20” works well to give enough room to “saw” the seal with the wire. Use the pick tool if needed to help guide the wire away from the car body as it exits the seal. Add the T-handles to the cutting wire, and working the wire back and forth, cut around to the next pin. Remove the wire, restart on the other side of the pin, and work the rest of the way around the glass. Going around a second time through the cut made is good insurance and only takes an extra minute or two to complete if it is needed. Under no circumstances should you pry on the glass – while glass is strong, it is brittle, and will shatter if mishandled. It is possible with care to remove the factory glass without damage so it can be reused at a later time if desired. The pins should be the only thing holding the glass in position at this point if they were not removed previously. After you are sure that all of the adhesive has been cut, gently press on the glass from the inside while someone outside receives it. If there is any excess force required, stop, and re-check that the seal has been completely cut. Beware that the glass may “fall out” if the pins were removed earlier and the entire seal is cut, so having someone outside to catch the glass is recommended.
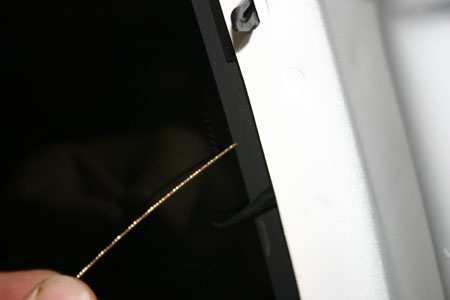
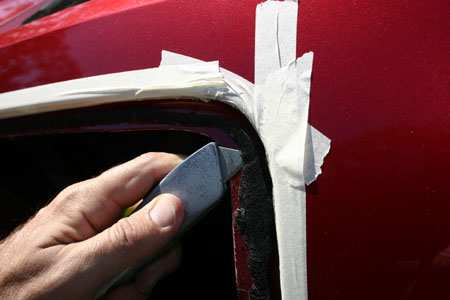
- With the window safely removed, clean up the seal area where the new louver will be installed. It is not necessary to completely remove the original seal; it is actually recommended that a small amount (.005-.025”) of the seal be left for the new seal to help adhere to. With that in mind, all loose dust, dirt, and seal cuttings need to be removed and cleaned from the surface. Also, pay close attention to the way in which the seal is laid out which helps to insure that no water can be trapped above the seal at the point where the two ends connect in the front area near one of the guide pins. After the area has been cleaned, wipe down with rubbing alcohol and clean any smudges made by the cutting of the seal. The tape can now be removed, and the window frame area cleaned up.
- Clean the application surface of the louver, and follow sealer’s directions for proper priming / preparation of louver surface. When using 3M Fast Weld Urethane, the proper primer is 3M Single step, P/N 08682, available separately – this can also be used to touch-up the pinch-weld if required. Apply the sealer to the prepared and cleaned area where the original seal was on the car’s body. Apply enough so that the louver will sit flush to slightly recessed when installed. A small excess is acceptable as the louver can be pressed in slightly more, while too little adhesive will cause the piece to sit too far below the surface of the body. The louvers are different, and are side specific, so be sure to install them in the correct orientation. The louvers point into the interior of the car (hence flush-mount). Follow the instructions of the seal supplier as to set-up times, and install the louvers. There should be approximately a.110” gap between the bottom of the louver and the body line when installed. A small soft shim or some tape may be required to help hold the louver in place as the seal dries depending upon conditions. Do NOT close doors with the windows in the up position or drive car until the seal has had time to cure. Failure to follow all instructions of seal manufacturer may result in seal failure or loss of louver!
- After sufficient time has passed for drying, a final check should be made for water sealing and no wind noise. Any abnormal amount of wind noise should be considered as a possible source of water entry, and should be checked to insure water cannot enter the inside of the vehicle. If water does leak into the vehicle, the louver should be removed, and re-installed to insure a proper seal. A properly installed louver will not leak, and has the exact same contours as OEM glass on both the sealing edge and the outer edge (frame) surfaces.
- Re-install the interior of the vehicle. The entire interior can be reinstalled once both windows have been replaced with the louvers and it is known that no leaks exist. Installation is the reverse of the dis-assembly / removal steps. Replace any damaged pins or push clips at this time to avoid new “noises” while driving down the road. Torque and install seat belt bolts and coat hooks according to factory service manual directions.
- After installation and sufficient drying time has elapsed, the louvers may be cleaned with a soft sponge and regular car wash soap. Over time, if scratches become a nuisance in the visibility areas, they may be polished out using a plastic headlight polish, or toothpaste for minor scratches. Do not use abrasive cleaners for normal everyday cleaning of the parts, as they are susceptible to scratching by the abrasives.
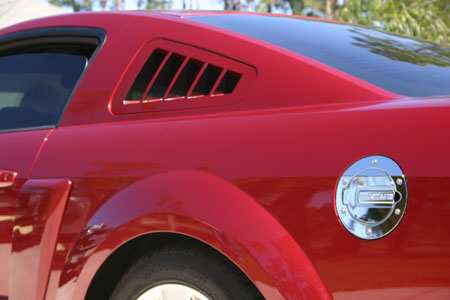
Finished Installation Exterior
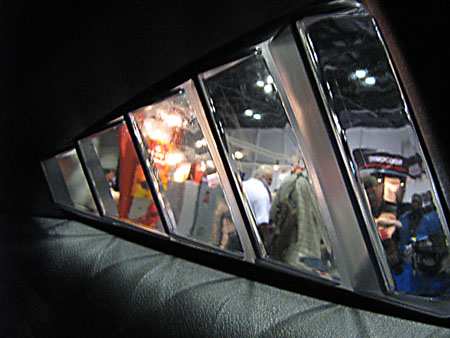
Finished Installation Interior
Installation instructions provided by SilverHorse Racing
Continue Shopping
- Shop all SilverHorse Racing Mustang Parts
- Shop all 05-09 Mustang Quarter Window Louvers & Scoops
- Shop all 05-09 Mustang Exterior Styling
Dylan I.
Nathaniel F.
Charles M
William L
Benjamin T
Johann S
Warren M
Ronald M
Jim G
Kristen H
Michael N
Jaime C
Alex G
Stacey H
Richard S
Josh W
Ricky I
Phillipe D
Greg W
Erin O
Dustin P
Heather W
Deborah L
Anthony A
Kenny O
Chris G
Bruce C
Kelvin A
Ronald H
Brian T
Anthony E
Daniel B
Ricky I
Linda W
Michael M
Emir H
Doug B
Chris G
Louis D
William S
Stefan O
Johnny B
James J
Noah B
Mac S
Richard M
Dennis S
Noah B
Richard M
Eric J
Michael A
Spencer T
Robert R
Sara A
William B
Erik S
James R
Kary K
John N
Emir H
Jonathan B
Sherry C
Josh W
William N.
Stratis R
Leo S
Joseph W
James C
George Y
Stephen C
David L
Richard A
Charles M
Albert B
Kyle P
Jim W
Walt S
Ronald B
Stephen H
Carlos G
Paul C
Aaron W
Robert S
Valerie J
Richard A
Ernesto C
Robert R
Steven T
Greg M
Jordan C
Ryan D.Customer Support
I grew up a Chevy kid, but when it came time to get a muscle car of my own, I fell in love with Mustangs. Been bleeding blue ever since. Being a Customer Service Rep at American Muscle lets me talk about the cars I love and how to make...
DaveTraining Director
I have been toying with Mustangs since before a driver's license was even an option. I've owned somewhere around 15 and I'm not done by a long shot. It all started with a 175 HP pearl white convertible Fox Body. It sparked my love for Mustang's and that sparked a...
BillCustomer Support
I'm currently a student at Penn State University studying political science. I've run a performance shop on the side for over a year now, and I've been working on cars for 7 years now. I've done transmissions, engines, and suspensions on many different cars. I used to be a Chevy...
GerryCustomer Support
When I retired after working for the city of Philadelphia and Septa I decided it was time to relive my earlier years and buy a real muscle car. (I also took on this job at AmericanMuscle for fun - I love the car and the community and belong to several...
KarenCustomer Support
I am a Mustangaholic. Do not try to cure me, I am perfectly OK with being one. I have owned over 10 Mustangs in my lifetime already. I currently have just 5 (I did own 8 at one time). I fell in love for the first time when I was...
DuncanMarketing
Got into cars when I was young. Always was into the Mustangs because of the movie 'Gone in 60 Seconds' with the 1967 Shelby GT500 Fast back when I was growing up. I am currently attending Universal Technical Institute for Automotive/Diesel and Ford Fact program. I just started working at...
DannBama Tuning Specialist
I may be the only person to ever brave a winter with drag radials on a Mustang, while still daily driving it. Don’t worry, I finally got them off in the spring (day late and a dollar short, right?), and I promptly finished those tires at our company picnic in...
CraigProduct Development
I have always been around Mustangs in my professional life, either fixing them as a mechanic, selling them at dealerships, or modding them here at AmericanMuscle. Instead of starting right away with the power mods, I started looking more into suspension and weight reduction. I have always dreamed of entering...
LeeCustomer Support
I am a diehard Mustang fanatic. I first fell in love with Mustangs when I was 15 years old and I found a 1966 Mustang coupe restoration project. That was the beginning of my addiction. I quickly added a 1993 Mustang LX 5.0 to my collection which served as my...
JamieCustomer Support
This whole story starts when I was 15 and I had to have a foxbody. So I went out and found the loudest fastest foxbody that 5 grand could buy. When I realized that this thing was a certain death trap I sold it and moved onto the 2000 GT...
HeatherCustomer Support - Lead
I went to automotive school in Exton, PA, and worked as a mechanic for a while. My dad is a huge Ford guy; he used to drag race and my uncles raced motorcycles so I was always in the garage growing up. Working here is nice because it's not as...
Ryan MBama Tuning Specialist
I got my first Mustang when I was 16, a two tone 91 GT red and silver with a sunroof that didn’t leak! And needless to say I was a bit timid to do work on it, I hadn’t modified any vehicle before outside of installing a CD player. I...
DrewCustomer Support
Recently I bought my first home, the selling point for the house was not the amount of land, bedrooms, or bathrooms like how most people would choose a home. I made my choice based on the garage where the mustang sleeps. The garage is completely finished with painted floors, walls,...
Mike JCustomer Support - Manager
My first car was a 1989 Ford Mustang Saleen Convertible that I used as my test car to learn about working on Mustangs. Foxbodies have become my passion and now I pretty much consider myself a Foxbody expert. My dream project car is a Foxbody with a 03-04 cobra swap...
KarenCustomer Support
I am a Mustangaholic. Do not try cure me, I am perfectly ok with being one. I have owned over 10 Mustangs in my lifetime already. I currently have just 5 (I did own 8 at one time). I fell in love for the first time when I was 13....
BrickPurchasing
I was a customer first - 7 years ago I came in to buy parts, got in an argument with someone about a part, and won. I left with my parts and a new job and I've been here ever since. I knew when I came to work at AmericanMuscle,...
JeffMarketing
I've loved Mustangs for as long as I can remember. My dad was a Camaro guy growing up, but his first work truck was a Ford, and we've been a Ford-only family ever since. My dad is a sheet metal worker/mechanic, so everything I know about my car I learned...
DanCustomer Support
All my other cars were all-wheel drive, my brother had an 04 cobra and i wanted to compete and beat him with naturally aspirated so i went with a mach1 - and beat him. Now he works here too! I got lucky and was able to find one of the...
SandyOperations
I have only driven 2 manual transmission Mustangs, the 1st was the car that taught me how to drive stick shift. The other is my current daily driver. A very memorable moment about my GT500 happened when I purchased a JLT CAI and SCT tuner. I thought the car was...
KarenCustomer Support
I am a Mustangaholic. Do not try cure me, I am perfectly ok with being one. I have owned over 10 Mustangs in my lifetime already. I currently have just 5 (I did own 8 at one time). I fell in love for the first time when I was 13....
Chris RMarketing
I was raised by a car family. Drag racing and the Ford blue oval were always a huge part of our household. During my high school years, working on cars and participa....err watching street races probably helped further pull my focus from my priorities and I was hooked. After high-school...
LeeCustomer Support
I am a diehard Mustang fanatic. I first fell in love with Mustangs when I was 15 and I found a 1966 Mustang coupe restoration project. That was the beginning of my addiction. When it came time for my wife to get a new car, she had already driven my...
MikeLead Calibrator & Ford Performance Expert
I’ve had 18 Mustangs, ranging from a stock 66 coupe to a low 9-second Fun Ford Weekend” Street Renegade 96 GT that made 888 RWHP. (308 cid motor, Edelbrock heads, intake and topped off with a Paxton Novi 2000R supercharger pushing 30 psi of boost). My best pass in that...
BrianContent Development
Mustangs hold a special place in my heart. My father owned a 65 mustang when he was younger, but a friend wrecked it. The grille pony still sits on his workbench. Until getting my own pony, I had no clue why he would keep a metal horse for so long....
JamieCustomer Support
This whole story starts when I was 15 and I had to have a foxbody. So I went out and found the loudest fastest foxbody that 5 grand could buy. When I realized that this thing was a certain death trap I sold it and moved onto the 2000 GT...
GerryCustomer Support
When I retired after working for the city of Philadelphia and Septa I decided it was time to relive my earlier years and buy a real muscle car. (I also took on this job at AmericanMuscle for fun - I love the car and the community and belong to several...
EthanInventory Control
I've worked here for 3 years now and done pretty much everything in the warehouse from mounting and balancing wheels/tires, driving the forklift, shipping, and receiving. Both my brothers worked here in other departments, keeping it in the family! My car philosophy's pretty simple, I just want to get where...
EXPLORE
CUSTOMER SERVICE
Sign up for Exclusive Deals & Offers
Connect


