- Shop All
- Sales & Specials
- Accessories
- Body Kits
- Brakes
- Drivetrain
- Engine
- Air, Oil & Fuel Filters
- Mass Air Flow Meters/Sensors
- Alternators
- Motor Mounts
- Batteries
- Nitrous Kits
- Camshafts
- Oil Pans
- Cold Air Intakes
- Radiators, Hoses & Accessories
- Coyote Engine Conversion Parts
- Reservoirs & Tanks
- Crate Engines & Blocks
- Serpentine Belts
- Cylinder Heads & Valvetrain
- Shaker Systems
- Engine Dressup
- Superchargers
- Fender Covers
- Throttle Bodies
- Fuel Delivery
- Turbochargers
- Gaskets
- Underdrive Pulleys
- HVAC Parts
- Valves, Sensors & Sending Units
- Ignition Parts
- Water Pumps & Accessories
- Intake Manifolds & Plenums
- Exhaust
- Exterior
- Antennas
- Hoods
- Body Kits
- License Plates & Frames
- Bras
- Light Covers
- Bumper Inserts
- Lightbars & Styling Bars
- Caliper Covers & Paint
- Louvers
- Car Covers
- Mud Flaps
- Chin Spoilers
- Mirrors & Mirror Covers
- Convertible Top Parts
- Paint & Headlight Protection Film
- Decals
- Pre-painted Parts
- Decklid Panels
- Racing Stripes
- Door Handles, Covers & Bezels
- Scoops
- Emblems & Badges
- Spoilers
- Exterior Trim
- Taillight Trim/Bezels
- Fuel Doors
- Wheel Accessories
- Grilles
- Wind Deflectors
- Hood Pin Kits
- Window Tint & Light Tint
- Intake
- Interior
- Lights
- Restoration
- Suspension
- Tires
- Tuners
- Wheels
- 2010-2013
- Sales & Specials
- Accessories
- Body Kits
- Brakes
- Drivetrain
- Engine
- Air, Oil & Fuel Filters
- Mass Air Flow Meters/Sensors
- Alternators
- Motor Mounts
- Batteries
- Nitrous Kits
- Camshafts
- Radiators, Hoses & Accessories
- Cold Air Intakes
- Reservoirs & Tanks
- Cylinder Heads & Valvetrain
- Shaker Systems
- Engine Dressup
- Superchargers
- Fender Covers
- Throttle Bodies
- Fuel Delivery
- Turbochargers
- Gaskets & Seals
- Underdrive Pulleys
- HVAC Parts
- Valves, Sensors & Sending Units
- Ignition Parts
- Water Pumps & Accessories
- Intake Manifolds & Plenums
- Exhaust
- Exterior
- Antennas
- Hoods
- Bras
- License Plates & Frames
- Caliper Covers
- Light Bars & Convertible Styling Bars
- Car Covers
- Louvers
- Chin Spoilers
- Mirrors & Mirror Covers
- Convertible Top Parts
- Mud Flaps
- Decals & Stripes
- Paint & Headlight Protection Film
- Decklid Panels
- Pre-Painted Parts
- Door Handles, Covers & Bezels
- Racing Stripes
- Emblems & Badges
- Scoops
- Exterior Trim
- Spoilers & Wings
- Fuel Doors
- Taillight Trim
- Grilles
- Wheel Accessories
- Hood Pins & Kits
- Window Tint & Light Tint
- Intake
- Interior
- Lights
- Restoration
- Suspension
- Tires
- Tuners
- Wheels
- 2005-2009
- Sales & Specials
- Accessories
- Body Kits
- Brakes
- Drivetrain
- Engine
- Air, Oil & Fuel Filters
- Mass Air Flow Meters/Sensors
- Alternators
- Motor Mounts
- Batteries
- Nitrous Kits
- Camshafts
- Radiators, Hoses & Accessories
- Cold Air Intakes
- Reservoirs & Tanks
- Cylinder Heads & Valvetrain
- Shaker Systems
- Engine Dressup
- Superchargers
- Fender Covers
- Throttle Bodies
- Fuel Delivery
- Turbochargers
- Gaskets & Seals
- Underdrive Pulleys
- HVAC Parts
- Valves, Sensors & Sending Units
- Ignition Parts
- Water Pumps & Accessories
- Intake Manifolds & Plenums
- Exhaust
- Exterior
- Antennas
- Hoods
- Bras
- License Plates & Frames
- Caliper Covers
- Light Bars & Convertible Styling Bars
- Car Covers
- Louvers
- Chin Spoilers
- Mirrors & Mirror Covers
- Convertible Top Parts
- Mud Flaps
- Decals & Stripes
- Paint & Headlight Protection Film
- Decklid Panels
- Pre-Painted Parts
- Door Handles, Covers & Bezels
- Racing Stripes
- Emblems & Badges
- Scoops
- Exterior Trim
- Spoilers & Wings
- Fuel Doors
- Taillight Trim
- Grilles
- Wheel Accessories
- Hood Pins & Kits
- Window Tint & Light Tint
- Intake
- Interior
- Lights
- Restoration
- Suspension
- Tires
- Tuners
- Wheels
- 1999-2004
- Sales & Specials
- Accessories
- Body Kits
- Brakes
- Drivetrain
- Engine
- Air, Oil & Fuel Filters
- Motor Mounts
- Alternators
- Nitrous Kits
- Batteries
- Oil Pans
- Camshafts
- Radiators, Hoses & Accessories
- Cold Air Intakes
- Replacement Serpentine Belts
- Cylinder Heads & Valvetrain
- Reservoirs & Tanks
- Engine Dressup
- Shaker Systems
- Fender Covers
- Superchargers
- Fuel Delivery
- Throttle Bodies
- Gaskets & Seals
- Turbochargers
- HVAC Parts
- Underdrive Pulleys
- Ignition Parts
- Valves, Sensors & Sending Units
- Intake Manifolds & Plenums
- Water Pumps & Accessories
- Mass Air Flow Meters/Sensors
- Exhaust
- Exterior
- Antennas
- Hood Pins
- Bras
- Hoods
- Bumper Inserts
- License Plates & Frames
- Caliper Covers
- Lightbars & Styling Bars
- Car Covers
- Louvers
- Chin Spoilers
- Mirrors & Mirror Covers
- Convertible Top Parts
- Mud Flaps
- Decals
- Racing Stripes
- Decklid Panels
- Scoops
- Door Handles, Covers & Bezels
- Spoilers & Wings
- Emblems & Badges
- Taillight Trim & Bezels
- Exterior Trim
- Wheel Accessories
- Fuel Doors
- Window Tint & Light Tint
- Grilles
- Intake
- Interior
- Lights
- Restoration
- Suspension
- Tires
- Tuners
- Wheels
- 1994-1998
- Sales & Specials
- Accessories
- Body Kits
- Brakes
- Drivetrain
- Engine
- Air, Oil & Fuel Filters
- Mass Air Flow Meters/Sensors
- Alternators
- Motor Mounts
- Batteries
- Nitrous Kits
- Camshafts
- Oil Pans
- Cold Air Intakes
- Radiators, Hoses & Accessories
- Cylinder Heads & Valvetrain
- Replacement Serpentine Belts
- Engine Dressup
- Reservoirs & Tanks
- Fender Covers
- Superchargers
- Fuel Delivery
- Throttle Bodies
- Gaskets & Seals
- Turbochargers
- HVAC Parts
- Underdrive Pulleys
- Ignition Parts
- Valves, Sensors & Sending Units
- Intake Manifolds & Plenums
- Water Pumps & Accessories
- Exhaust
- Exterior
- Antennas
- Hood Pins & Kits
- Bras
- Hoods
- Bumper Inserts
- License Plates & Frames
- Caliper Covers
- Light Bars & Convertible Styling Bars
- Car Covers
- Louvers
- Chin Spoilers
- Mirrors & Mirror Covers
- Convertible Top Parts
- Racing Stripes
- Decals & Stripes
- Scoops
- Door Handles, Covers & Bezels
- Spoilers & Wings
- Emblems & Badges
- Taillight Trim & Bezels
- Exterior Trim
- Wheel Accessories
- Fuel Doors
- Window Tint & Light Tint
- Grilles
- Intake
- Interior
- Lights
- Restoration
- Suspension
- Tires
- Tuners
- Wheels
- 1979-1993
- Sales & Specials
- Accessories
- Body Kits
- Brakes
- Drivetrain
- Engine
- Air, Oil & Fuel Filters
- Mass Air Flow Meters/Sensors
- Alternators
- Motor Mounts
- Batteries
- Nitrous Kits
- Camshafts
- Oil Pans
- Cold Air Intakes
- Radiators, Hoses & Accessories
- Cylinder Heads & Valvetrain
- Replacement Serpentine Belts
- Engine Dressup
- Reservoirs & Tanks
- Fender Covers
- Superchargers
- Fuel Delivery
- Throttle Bodies
- Gaskets & Seals
- Turbochargers
- HVAC Parts
- Underdrive Pulleys
- Ignition Parts
- Valves, Sensors & Sending Units
- Intake Manifolds & Plenums
- Water Pumps & Accessories
- Exhaust
- Exterior
- Antennas
- Hood Pins & Kits
- Bumper Inserts
- Hoods
- Caliper Covers
- License Plates & Frames
- Car Covers
- Light Bars & Convertible Styling Bars
- Convertible Top Parts
- Louvers
- Decals & Stripes
- Mirrors & Mirror Covers
- Door Handles, Covers & Bezels
- Racing Stripes
- Emblems & Badges
- Spoilers & Wings
- Exterior Trim
- Wheel Accessories
- Grilles
- Intake
- Interior
- Lights
- Restoration
- Suspension
- Tires
- Tuners
- Wheels
How to Install a 3D Carbon Boy Racer Body Kit on Your 2010-2012 Mustang GT & V6
This Mustang Parts Installation Guide Works For
| Tools Required
Installation Time: 1 Day |
Installation
| QTY | 3D PART NO. | DESCRIPTION |
|---|---|---|
| 1 | 691609 | FRONT BUMPER REPLACEMENT |
| 1 | 691610 | RIGHT SIDE SKIRT |
| 1 | 691611 | LEFT SIDE SKIRT |
| 1 | 691612 | REAR LOWER SKIRT |
| 4 | 3M 94 | 3M ADHESION PROMOTER |
| HARDWARE SUPPLIED | |
|---|---|
| 16 | #8 X ¾” SELF DRILLING SCREWS |
| 12 | FEET 3M DOUBLE FACE TAPE |
| 6 | STAINLESS STEEL SCREWS W/ WASHERS |
| 4 | GARNISH MOULDING FASTENERS |
| 1 | MESH GRILLE |
CAUTION! ! ! ! IF A HEATED SPRAY BOOTH IS USED FOR BAKING THE PRIMER OR PAINT, DO NOT BAKE OR CURE GREATER THAN 120 F DEGREES FARENHEIT. THE PARTS CAN BE DISTORTED AND PERMANENTLY DAMAGED.
NOTE: These step by step installation instructions are for after the kit is painted. Please see the “Prepping and Painting” Instructions prior to prepping the parts for paint.
PREPPING THE KIT PRIOR TO PAINT
The first step is to inspect the parts to make sure you have the correct parts. Refer to the part numbers on the back of the parts to confirm the Year – Make – Model. Parts that are prepped and painted cannot be returned or exchanged.
Using lacquer thinner and a clean cloth – clean the tape flange surface on the back of each part where the double-sided tape will be applied. Using 1” masking tape, apply the tape 1/8” below the top edge of the part. This will protect the tape flange from getting contaminated during the prepping and painting process. Refer to Prepping and Painting Instructions for “Step by Step” procedures.
APPLYING THE 3M TAPE TO THE KIT
After the kit has been prepped and painted, the double face tape should be applied to the parts. The tape is not pre-installed on parts prior to shipping because the tape can be contaminated during the sanding/ priming and painting process.
The first step is to clean the tape flange on the back of the parts where the tape will be applied. Make sure the complete tape flange is clean and free of all primer and paint. Using lacquer thinner on a clean rag, thoroughly clean the tape flanges on all parts of the kit.
Using the adhesion promoter bottle with felt tip supplied, apply it to the tape flanges – be careful not press too hard causing too much to be applied. The adhesion promoter will leave a thin clear polymer primer film that will increase the bonding strength of the double face tape.
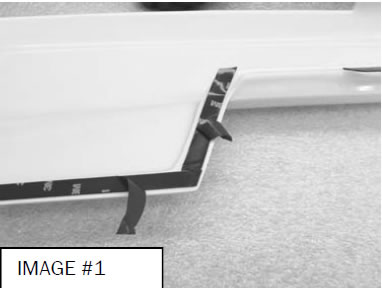
The tape should be applied 1/8” down from the top edge of the part so that it cannot be seen after the kit is installed. The tape is to be applied from the wheel well to the center. Press the tape firmly to the surface to ensure good adhesion. (See image #1)
Repeat the cleaning and adhesion promoter steps on all parts of the kit.
FRONT BUMPER REPLACEMENT
| HARDWARE SUPPLIED | |
|---|---|
| 2 | #8 X ¾” SELF DRILLING SCREWS |
| 6 | STAINLESS STEEL SCREWS W/ WASHERS |
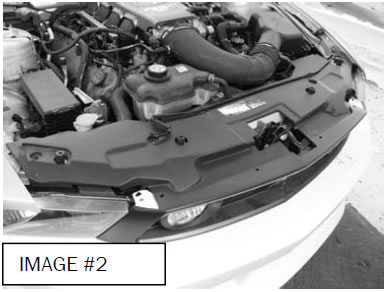
STEP 1) Open the hood and remove the trim panel over the radiator by using a clip puller - remove the (8) plastic push clips (See Image #2). Remove the (2) 8mm screws that secure the top of the front bumper. Remove the (2) 7mm screws in each wheel well that secure the bumper to the inner fender panel. Locate and remove the (4) 5.5mm screws under the front of the bumper that secure the bumper to the wind deflector panel. DO NOT DISCARD THE FACTORY SCREWS AND CLIPS. They will be used to install the 3dCarbon front bumper replacement in Step 7.
STEP 2) Carefully pull the bumper forward enough to access the wiring connectors on the side fog and marker lights. Disconnect the plug from the side marker lights. Locate and remove the air temperature sensor and relocate it as shown in images #3-5. Now remove the bumper completely from the car. Remove the front marker lights and the front grille from the bumper.

STEP 3) Remove the factory grille from the factory bumper. DO NOT DISCARD. It will be re-installed on the 3dCarbon front bumper. (See Images #6-8.)

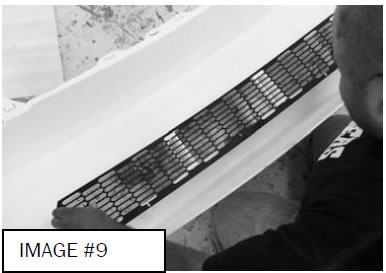
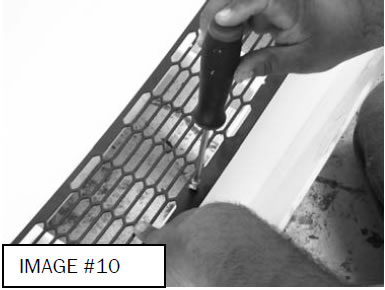
STEP 5) Lay the new 3d bumper replacement upside down. Place the supplied aluminum mesh grille inside the bumper. Check fit the grille in the opening. Using a screw gun with a Phillips head tip and the (6) stainless steel screws and washers provided, secure the aluminum grille to the front bumper. (See Images #9-10)
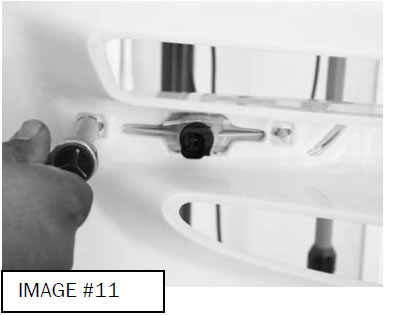
STEP 6) Install the original marker lights on the new 3dCarbon bumper. Secure the lights with the factory 10mm nuts. (See Image #11)
STEP 7) Install the new 3dCarbon front bumper replacement on to the vehicle. Re-install the trim panel over the radiator by using the (8) factory plastic push clips (See Image). Re-install the (2) factory 8mm screws that secure the top of the front bumper. Re-install the (2) 7mm factory screws through the pre-drilled holes in each wheel well that secure the bumper to the inner fender panel. Reinstall the (4) 5.5mm screws under the front of the bumper that secure the bumper to the wind deflector panel.
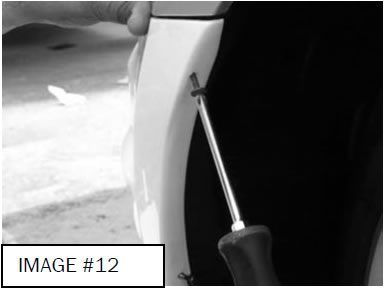
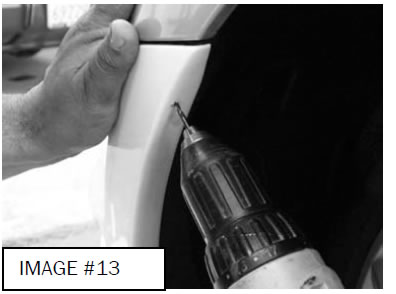
STEP 8) Using a 1/8” drill, drill into the factory bracket in the wheel well and secure with the #8x3/4” self tapping screws provided. (See Images #12-13)
SIDE SKIRTS
| HARDWARE SUPPLIED | |
|---|---|
| 12 | #8 X ¾” SELF DRILLING SCREWS |
| 8 | ADHESION PROMOTER |
| 12 FEET | 3M DOUBLE FACE TAPE |
Step 1) Using a clip removal tool, remove the two plastic clips on each side skirt that secure the factory side skirts in the front wheel wells. Save these for reinstallation of the new side skirts.
Step 2) Using a clip removal tool, remove the clips that secure the factory side skirts on the bottom of the car. Pull the side skirt off the car. Remove any of the clips that stay on the car.
Step 3) Check fit of the new side skirt on the car. After the fit is confirmed, using a grease pencil draw a line along the top of the part for reference during the final installation.
Step 4) Remove the part from the car and using lacquer Thinner, on a clean lint-free cloth, wipe the paint surface where the tape will attach. Be careful not to remove the grease pencil marks. Using the adhesion promoter packages supplied, apply the adhesion promoter to the paint surface where the tape will attach. Be careful not to remove the grease pencil marks during the application.
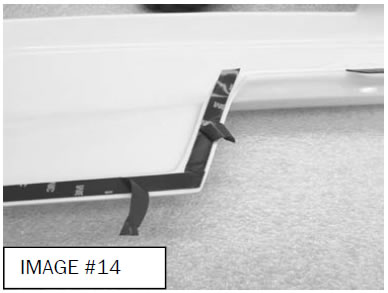
Step 5) Peel back a small piece of the red plastic backing from the tape, making a tail that can be pulled when the side skirt is installed. (See Image #14)
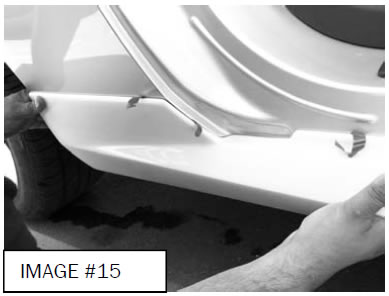
Step 6) Place the side skirt on the car, positioning it using the grease pencil marks as a reference. Starting with either end, pull the red backing tail and press the new side skirt to the paint surface at the same time. (See Image #15)
Step 7) Using the supplied #8 x ¾” self-tapping screws, secure the side skirt in the wheel wells through the pre-drilled holes in the rear of the side skirt. Using the factory clips removed from the original side skirts, secure the front of the side skirt through the pre-drilled holes.
Step 8) Locate the (4) pre-drilled holes under the side skirt and secure it to the vehicle using the supplied #8 x ¾” self-tapping screws.
REAR LOWER
| HARDWARE SUPPLIED | |
|---|---|
| 4 | GARNISH MOULDING FASTENERS |
| 2 | #8 X ¾” SELF DRILLING SCREWS |
STEP 1) Open the trunk and locate the black plastic trim panel that goes around the rear latch. Remove the (4) plastic clips that secure the trim panel.
STEP 2) Remove the two factory taillights. This will make it easier to remove the rear bumper. They will be reinstalled in the new rear bumper.
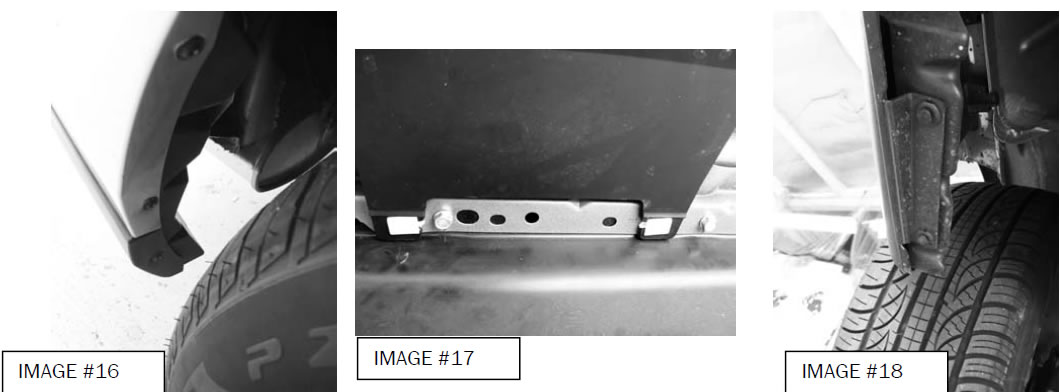
STEP 3) Locate and remove the (3) Phillips head screws in each wheel well that secure the bumper to the body using a 90 degree angle screw gun-Phillips screwdriver tip. Locate and remove the (2) clips that secure the underside of the bumper to the body. Repeat for opposite side. (See Images #16-18) Also remove the two clips in the middle of the bumper. (See Image) The bumper is now ready to pull off the car.
STEP 4) Lay the factory rear bumper on a clean surface. Locate and remove the factory clips and screws that secure the upper and lower half of the factory rear lower. Do not discard any of this hardware. It will be used in the installation of the new 3dCarbon rear lower.
STEP 5) Align the tabs in the 3dCarbon rear with holes in the factory rear bumper and install the new 3dCarbon rear lower bumper on the factory rear. Using the factory clips removed in the previous step, reinstall them on the new 3dCarbon rear lower. (See Image #19-21)

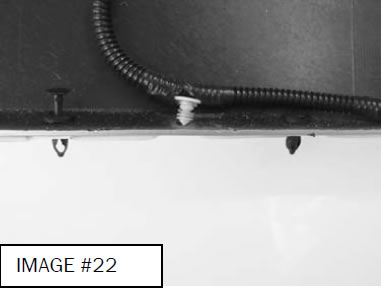
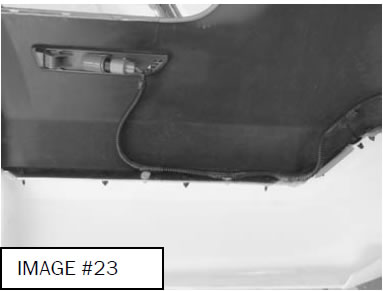
STEP 6) Reinstall the factory clips and hardware through the predrilled holes on the new 3dCarbon bumper. (See Images # 22-23)
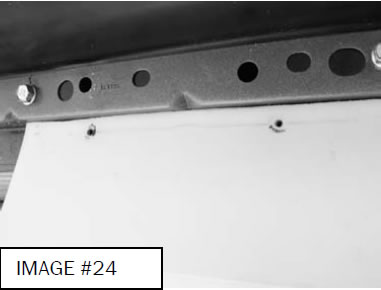
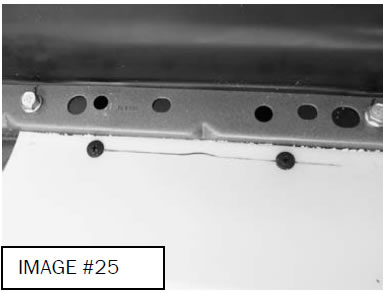
STEP 7) Reinstall the rear bumper onto the vehicle. Reinstall the (3) Phillips head screws through each wheel well using the 90-degree screw gun Phillips head screw tip. Secure the lower half flange to the vehicle using (2) #8 x 3/4” self-tapping screws. (See Images # 24-25)
Continue Shopping
- Shop all 3dCarbon Mustang Body Kits
- Shop all 10-13 Mustang Body Kits
- Shop all Mustang Body Kits
Dylan I.
Nathaniel F.
Charles M
William L
Benjamin T
Johann S
Warren M
Ronald M
Jim G
Kristen H
Michael N
Jaime C
Alex G
Stacey H
Richard S
Josh W
Ricky I
Phillipe D
Greg W
Erin O
Dustin P
Heather W
Deborah L
Anthony A
Kenny O
Chris G
Bruce C
Kelvin A
Ronald H
Brian T
Anthony E
Daniel B
Ricky I
Linda W
Michael M
Emir H
Doug B
Chris G
Louis D
William S
Stefan O
Johnny B
James J
Noah B
Mac S
Richard M
Dennis S
Noah B
Richard M
Eric J
Michael A
Spencer T
Robert R
Sara A
William B
Erik S
James R
Kary K
John N
Emir H
Jonathan B
Sherry C
Josh W
William N.
Stratis R
Leo S
Joseph W
James C
George Y
Stephen C
David L
Richard A
Charles M
Albert B
Kyle P
Jim W
Walt S
Ronald B
Stephen H
Carlos G
Paul C
Aaron W
Robert S
Valerie J
Richard A
Ernesto C
Robert R
Steven T
Greg M
Jordan C
Ryan D.Customer Support
I grew up a Chevy kid, but when it came time to get a muscle car of my own, I fell in love with Mustangs. Been bleeding blue ever since. Being a Customer Service Rep at American Muscle lets me talk about the cars I love and how to make...
DaveTraining Director
I have been toying with Mustangs since before a driver's license was even an option. I've owned somewhere around 15 and I'm not done by a long shot. It all started with a 175 HP pearl white convertible Fox Body. It sparked my love for Mustang's and that sparked a...
BillCustomer Support
I'm currently a student at Penn State University studying political science. I've run a performance shop on the side for over a year now, and I've been working on cars for 7 years now. I've done transmissions, engines, and suspensions on many different cars. I used to be a Chevy...
GerryCustomer Support
When I retired after working for the city of Philadelphia and Septa I decided it was time to relive my earlier years and buy a real muscle car. (I also took on this job at AmericanMuscle for fun - I love the car and the community and belong to several...
KarenCustomer Support
I am a Mustangaholic. Do not try to cure me, I am perfectly OK with being one. I have owned over 10 Mustangs in my lifetime already. I currently have just 5 (I did own 8 at one time). I fell in love for the first time when I was...
DuncanMarketing
Got into cars when I was young. Always was into the Mustangs because of the movie 'Gone in 60 Seconds' with the 1967 Shelby GT500 Fast back when I was growing up. I am currently attending Universal Technical Institute for Automotive/Diesel and Ford Fact program. I just started working at...
DannBama Tuning Specialist
I may be the only person to ever brave a winter with drag radials on a Mustang, while still daily driving it. Don’t worry, I finally got them off in the spring (day late and a dollar short, right?), and I promptly finished those tires at our company picnic in...
CraigProduct Development
I have always been around Mustangs in my professional life, either fixing them as a mechanic, selling them at dealerships, or modding them here at AmericanMuscle. Instead of starting right away with the power mods, I started looking more into suspension and weight reduction. I have always dreamed of entering...
LeeCustomer Support
I am a diehard Mustang fanatic. I first fell in love with Mustangs when I was 15 years old and I found a 1966 Mustang coupe restoration project. That was the beginning of my addiction. I quickly added a 1993 Mustang LX 5.0 to my collection which served as my...
JamieCustomer Support
This whole story starts when I was 15 and I had to have a foxbody. So I went out and found the loudest fastest foxbody that 5 grand could buy. When I realized that this thing was a certain death trap I sold it and moved onto the 2000 GT...
HeatherCustomer Support - Lead
I went to automotive school in Exton, PA, and worked as a mechanic for a while. My dad is a huge Ford guy; he used to drag race and my uncles raced motorcycles so I was always in the garage growing up. Working here is nice because it's not as...
Ryan MBama Tuning Specialist
I got my first Mustang when I was 16, a two tone 91 GT red and silver with a sunroof that didn’t leak! And needless to say I was a bit timid to do work on it, I hadn’t modified any vehicle before outside of installing a CD player. I...
DrewCustomer Support
Recently I bought my first home, the selling point for the house was not the amount of land, bedrooms, or bathrooms like how most people would choose a home. I made my choice based on the garage where the mustang sleeps. The garage is completely finished with painted floors, walls,...
Mike JCustomer Support - Manager
My first car was a 1989 Ford Mustang Saleen Convertible that I used as my test car to learn about working on Mustangs. Foxbodies have become my passion and now I pretty much consider myself a Foxbody expert. My dream project car is a Foxbody with a 03-04 cobra swap...
KarenCustomer Support
I am a Mustangaholic. Do not try cure me, I am perfectly ok with being one. I have owned over 10 Mustangs in my lifetime already. I currently have just 5 (I did own 8 at one time). I fell in love for the first time when I was 13....
BrickPurchasing
I was a customer first - 7 years ago I came in to buy parts, got in an argument with someone about a part, and won. I left with my parts and a new job and I've been here ever since. I knew when I came to work at AmericanMuscle,...
JeffMarketing
I've loved Mustangs for as long as I can remember. My dad was a Camaro guy growing up, but his first work truck was a Ford, and we've been a Ford-only family ever since. My dad is a sheet metal worker/mechanic, so everything I know about my car I learned...
DanCustomer Support
All my other cars were all-wheel drive, my brother had an 04 cobra and i wanted to compete and beat him with naturally aspirated so i went with a mach1 - and beat him. Now he works here too! I got lucky and was able to find one of the...
SandyOperations
I have only driven 2 manual transmission Mustangs, the 1st was the car that taught me how to drive stick shift. The other is my current daily driver. A very memorable moment about my GT500 happened when I purchased a JLT CAI and SCT tuner. I thought the car was...
KarenCustomer Support
I am a Mustangaholic. Do not try cure me, I am perfectly ok with being one. I have owned over 10 Mustangs in my lifetime already. I currently have just 5 (I did own 8 at one time). I fell in love for the first time when I was 13....
Chris RMarketing
I was raised by a car family. Drag racing and the Ford blue oval were always a huge part of our household. During my high school years, working on cars and participa....err watching street races probably helped further pull my focus from my priorities and I was hooked. After high-school...
LeeCustomer Support
I am a diehard Mustang fanatic. I first fell in love with Mustangs when I was 15 and I found a 1966 Mustang coupe restoration project. That was the beginning of my addiction. When it came time for my wife to get a new car, she had already driven my...
MikeLead Calibrator & Ford Performance Expert
I’ve had 18 Mustangs, ranging from a stock 66 coupe to a low 9-second Fun Ford Weekend” Street Renegade 96 GT that made 888 RWHP. (308 cid motor, Edelbrock heads, intake and topped off with a Paxton Novi 2000R supercharger pushing 30 psi of boost). My best pass in that...
BrianContent Development
Mustangs hold a special place in my heart. My father owned a 65 mustang when he was younger, but a friend wrecked it. The grille pony still sits on his workbench. Until getting my own pony, I had no clue why he would keep a metal horse for so long....
JamieCustomer Support
This whole story starts when I was 15 and I had to have a foxbody. So I went out and found the loudest fastest foxbody that 5 grand could buy. When I realized that this thing was a certain death trap I sold it and moved onto the 2000 GT...
GerryCustomer Support
When I retired after working for the city of Philadelphia and Septa I decided it was time to relive my earlier years and buy a real muscle car. (I also took on this job at AmericanMuscle for fun - I love the car and the community and belong to several...
EthanInventory Control
I've worked here for 3 years now and done pretty much everything in the warehouse from mounting and balancing wheels/tires, driving the forklift, shipping, and receiving. Both my brothers worked here in other departments, keeping it in the family! My car philosophy's pretty simple, I just want to get where...
EXPLORE
CUSTOMER SERVICE
Sign up for Exclusive Deals & Offers
Connect


