- Shop All
- Sales & Specials
- Accessories
- Body Kits
- Brakes
- Drivetrain
- Engine
- Air, Oil & Fuel Filters
- Mass Air Flow Meters/Sensors
- Alternators
- Motor Mounts
- Batteries
- Nitrous Kits
- Camshafts
- Oil Pans
- Cold Air Intakes
- Radiators, Hoses & Accessories
- Coyote Engine Conversion Parts
- Reservoirs & Tanks
- Crate Engines & Blocks
- Serpentine Belts
- Cylinder Heads & Valvetrain
- Shaker Systems
- Engine Dressup
- Superchargers
- Fender Covers
- Throttle Bodies
- Fuel Delivery
- Turbochargers
- Gaskets
- Underdrive Pulleys
- HVAC Parts
- Valves, Sensors & Sending Units
- Ignition Parts
- Water Pumps & Accessories
- Intake Manifolds & Plenums
- Exhaust
- Exterior
- Antennas
- Hoods
- Body Kits
- License Plates & Frames
- Bras
- Light Covers
- Bumper Inserts
- Lightbars & Styling Bars
- Caliper Covers & Paint
- Louvers
- Car Covers
- Mud Flaps
- Chin Spoilers
- Mirrors & Mirror Covers
- Convertible Top Parts
- Paint & Headlight Protection Film
- Decals
- Pre-painted Parts
- Decklid Panels
- Racing Stripes
- Door Handles, Covers & Bezels
- Scoops
- Emblems & Badges
- Spoilers
- Exterior Trim
- Taillight Trim/Bezels
- Fuel Doors
- Wheel Accessories
- Grilles
- Wind Deflectors
- Hood Pin Kits
- Window Tint & Light Tint
- Intake
- Interior
- Lights
- Restoration
- Suspension
- Tires
- Tuners
- Wheels
- 2010-2013
- Sales & Specials
- Accessories
- Body Kits
- Brakes
- Drivetrain
- Engine
- Air, Oil & Fuel Filters
- Mass Air Flow Meters/Sensors
- Alternators
- Motor Mounts
- Batteries
- Nitrous Kits
- Camshafts
- Radiators, Hoses & Accessories
- Cold Air Intakes
- Reservoirs & Tanks
- Cylinder Heads & Valvetrain
- Shaker Systems
- Engine Dressup
- Superchargers
- Fender Covers
- Throttle Bodies
- Fuel Delivery
- Turbochargers
- Gaskets & Seals
- Underdrive Pulleys
- HVAC Parts
- Valves, Sensors & Sending Units
- Ignition Parts
- Water Pumps & Accessories
- Intake Manifolds & Plenums
- Exhaust
- Exterior
- Antennas
- Hoods
- Bras
- License Plates & Frames
- Caliper Covers
- Light Bars & Convertible Styling Bars
- Car Covers
- Louvers
- Chin Spoilers
- Mirrors & Mirror Covers
- Convertible Top Parts
- Mud Flaps
- Decals & Stripes
- Paint & Headlight Protection Film
- Decklid Panels
- Pre-Painted Parts
- Door Handles, Covers & Bezels
- Racing Stripes
- Emblems & Badges
- Scoops
- Exterior Trim
- Spoilers & Wings
- Fuel Doors
- Taillight Trim
- Grilles
- Wheel Accessories
- Hood Pins & Kits
- Window Tint & Light Tint
- Intake
- Interior
- Lights
- Restoration
- Suspension
- Tires
- Tuners
- Wheels
- 2005-2009
- Sales & Specials
- Accessories
- Body Kits
- Brakes
- Drivetrain
- Engine
- Air, Oil & Fuel Filters
- Mass Air Flow Meters/Sensors
- Alternators
- Motor Mounts
- Batteries
- Nitrous Kits
- Camshafts
- Radiators, Hoses & Accessories
- Cold Air Intakes
- Reservoirs & Tanks
- Cylinder Heads & Valvetrain
- Shaker Systems
- Engine Dressup
- Superchargers
- Fender Covers
- Throttle Bodies
- Fuel Delivery
- Turbochargers
- Gaskets & Seals
- Underdrive Pulleys
- HVAC Parts
- Valves, Sensors & Sending Units
- Ignition Parts
- Water Pumps & Accessories
- Intake Manifolds & Plenums
- Exhaust
- Exterior
- Antennas
- Hoods
- Bras
- License Plates & Frames
- Caliper Covers
- Light Bars & Convertible Styling Bars
- Car Covers
- Louvers
- Chin Spoilers
- Mirrors & Mirror Covers
- Convertible Top Parts
- Mud Flaps
- Decals & Stripes
- Paint & Headlight Protection Film
- Decklid Panels
- Pre-Painted Parts
- Door Handles, Covers & Bezels
- Racing Stripes
- Emblems & Badges
- Scoops
- Exterior Trim
- Spoilers & Wings
- Fuel Doors
- Taillight Trim
- Grilles
- Wheel Accessories
- Hood Pins & Kits
- Window Tint & Light Tint
- Intake
- Interior
- Lights
- Restoration
- Suspension
- Tires
- Tuners
- Wheels
- 1999-2004
- Sales & Specials
- Accessories
- Body Kits
- Brakes
- Drivetrain
- Engine
- Air, Oil & Fuel Filters
- Motor Mounts
- Alternators
- Nitrous Kits
- Batteries
- Oil Pans
- Camshafts
- Radiators, Hoses & Accessories
- Cold Air Intakes
- Replacement Serpentine Belts
- Cylinder Heads & Valvetrain
- Reservoirs & Tanks
- Engine Dressup
- Shaker Systems
- Fender Covers
- Superchargers
- Fuel Delivery
- Throttle Bodies
- Gaskets & Seals
- Turbochargers
- HVAC Parts
- Underdrive Pulleys
- Ignition Parts
- Valves, Sensors & Sending Units
- Intake Manifolds & Plenums
- Water Pumps & Accessories
- Mass Air Flow Meters/Sensors
- Exhaust
- Exterior
- Antennas
- Hood Pins
- Bras
- Hoods
- Bumper Inserts
- License Plates & Frames
- Caliper Covers
- Lightbars & Styling Bars
- Car Covers
- Louvers
- Chin Spoilers
- Mirrors & Mirror Covers
- Convertible Top Parts
- Mud Flaps
- Decals
- Racing Stripes
- Decklid Panels
- Scoops
- Door Handles, Covers & Bezels
- Spoilers & Wings
- Emblems & Badges
- Taillight Trim & Bezels
- Exterior Trim
- Wheel Accessories
- Fuel Doors
- Window Tint & Light Tint
- Grilles
- Intake
- Interior
- Lights
- Restoration
- Suspension
- Tires
- Tuners
- Wheels
- 1994-1998
- Sales & Specials
- Accessories
- Body Kits
- Brakes
- Drivetrain
- Engine
- Air, Oil & Fuel Filters
- Mass Air Flow Meters/Sensors
- Alternators
- Motor Mounts
- Batteries
- Nitrous Kits
- Camshafts
- Oil Pans
- Cold Air Intakes
- Radiators, Hoses & Accessories
- Cylinder Heads & Valvetrain
- Replacement Serpentine Belts
- Engine Dressup
- Reservoirs & Tanks
- Fender Covers
- Superchargers
- Fuel Delivery
- Throttle Bodies
- Gaskets & Seals
- Turbochargers
- HVAC Parts
- Underdrive Pulleys
- Ignition Parts
- Valves, Sensors & Sending Units
- Intake Manifolds & Plenums
- Water Pumps & Accessories
- Exhaust
- Exterior
- Antennas
- Hood Pins & Kits
- Bras
- Hoods
- Bumper Inserts
- License Plates & Frames
- Caliper Covers
- Light Bars & Convertible Styling Bars
- Car Covers
- Louvers
- Chin Spoilers
- Mirrors & Mirror Covers
- Convertible Top Parts
- Racing Stripes
- Decals & Stripes
- Scoops
- Door Handles, Covers & Bezels
- Spoilers & Wings
- Emblems & Badges
- Taillight Trim & Bezels
- Exterior Trim
- Wheel Accessories
- Fuel Doors
- Window Tint & Light Tint
- Grilles
- Intake
- Interior
- Lights
- Restoration
- Suspension
- Tires
- Tuners
- Wheels
- 1979-1993
- Sales & Specials
- Accessories
- Body Kits
- Brakes
- Drivetrain
- Engine
- Air, Oil & Fuel Filters
- Mass Air Flow Meters/Sensors
- Alternators
- Motor Mounts
- Batteries
- Nitrous Kits
- Camshafts
- Oil Pans
- Cold Air Intakes
- Radiators, Hoses & Accessories
- Cylinder Heads & Valvetrain
- Replacement Serpentine Belts
- Engine Dressup
- Reservoirs & Tanks
- Fender Covers
- Superchargers
- Fuel Delivery
- Throttle Bodies
- Gaskets & Seals
- Turbochargers
- HVAC Parts
- Underdrive Pulleys
- Ignition Parts
- Valves, Sensors & Sending Units
- Intake Manifolds & Plenums
- Water Pumps & Accessories
- Exhaust
- Exterior
- Antennas
- Hood Pins & Kits
- Bumper Inserts
- Hoods
- Caliper Covers
- License Plates & Frames
- Car Covers
- Light Bars & Convertible Styling Bars
- Convertible Top Parts
- Louvers
- Decals & Stripes
- Mirrors & Mirror Covers
- Door Handles, Covers & Bezels
- Racing Stripes
- Emblems & Badges
- Spoilers & Wings
- Exterior Trim
- Wheel Accessories
- Grilles
- Intake
- Interior
- Lights
- Restoration
- Suspension
- Tires
- Tuners
- Wheels
How to Install a CDC Shaker System for a 1999-2004 Mustang GT
This Mustang Parts Installation Guide Works For
| Tools Required
|
Installation
Air tube:
- Open hood and remove stock air filter housing.
- Cut out appropriate areas of the air filter template and tape it to the housing as shown below.
- Mark the hole location with a marker and cut out with jig saw.
- Drill a 5/16” hole in the lowest point of housing for drainage.
- Attach the air tube to housing by working it into the cutout. This takes a little brute force.
- Set completed air tube aside until later.
Hood appliqué
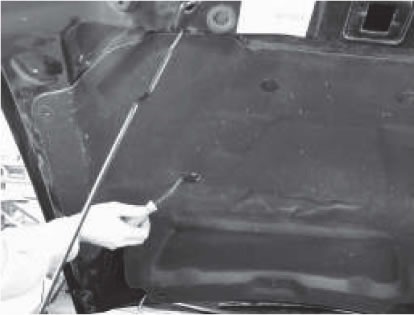
- Remove push pins from hood blanket with pry bar. Hood blanket can be left on hood to prevent shavings from getting into engine bay. I also put a piece of card board on the blanket to make sure I wouldn’t cut too deeply.
- If factory hood scoop installed, remove that too.
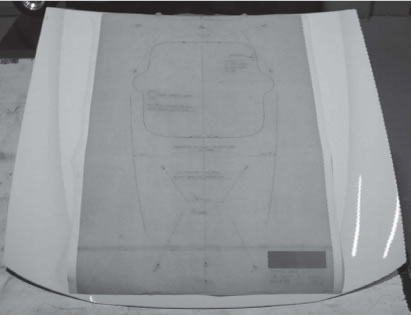
- Lay hood down, but do not close all the way. Lay template on hood using feature lines. Tape template to hood once centered and aligned properly.
Note:This is the hardest, most time consuming part of the install due to the curves of the hood, so make sure to double and triple check measurements so template is in proper position before making any cuts.
- Use a 1” hole saw to drill a starter hole where specified. Use jig saw to cut out shaker hole.
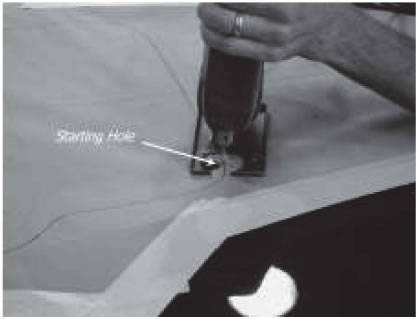
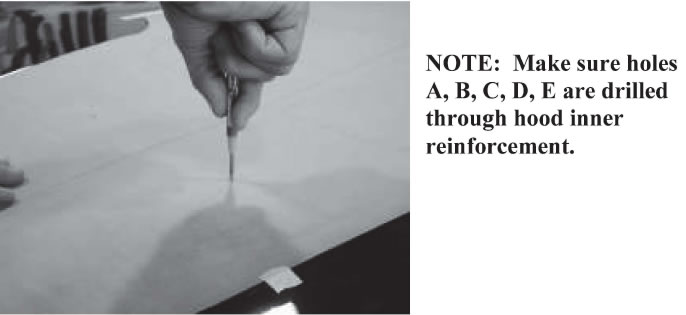
- Use a center punch on the hole locations specified on the template. Drill locations with a 1/8” pilot hole. The front two holes need to be drilled perpendicular to the ground, not the hood.
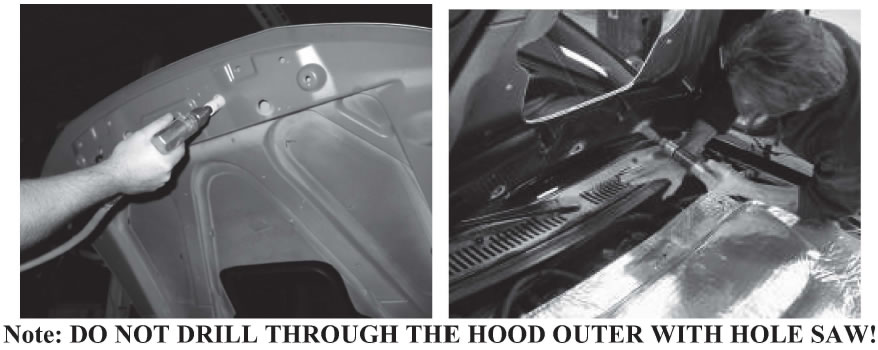
- Lift the hood and use 1” hole saw on holes that go through inner reinforcement.Don’t go all the way back through to outer hood with the hole saw
- Lay hood back down and drill out pilot holes with size indicated on template.
- Put appliqué on hood to make sure it fits. Some holes may need adjustment.
- Remove template and all tape from hood.
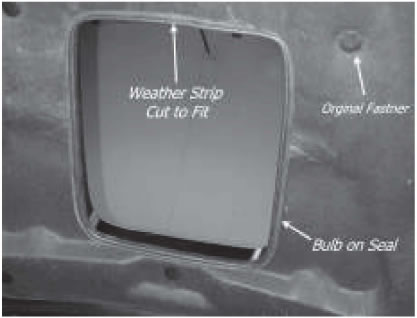
- Attach appliqué with the supplied hardware..
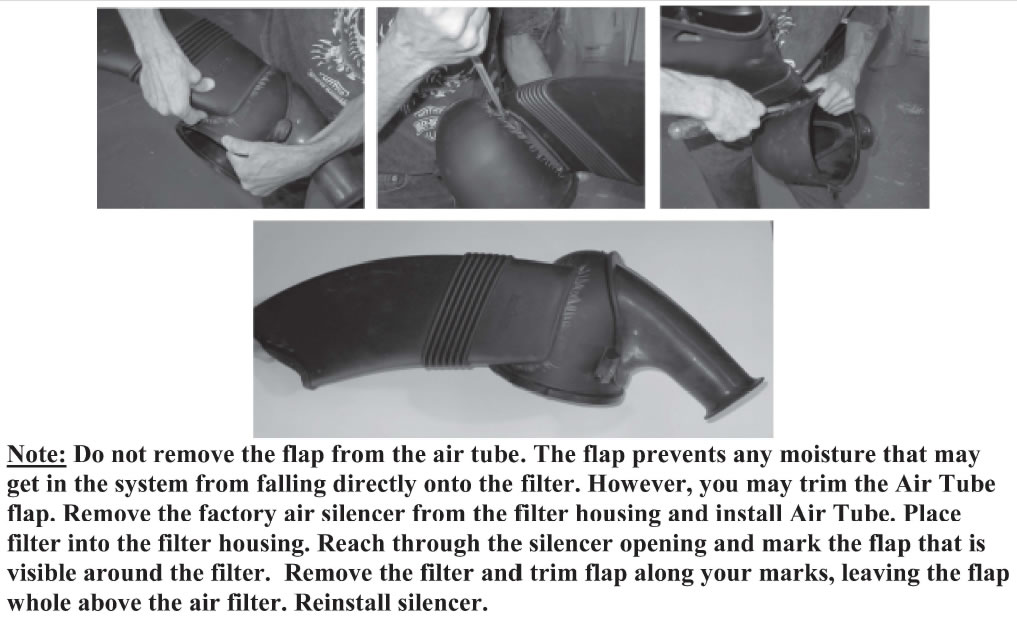
- Attach hood blanket back to hood and use box cutter to cut out the shaker hole.
- Install weather strip on appliqué as shown below.
Shaker scoop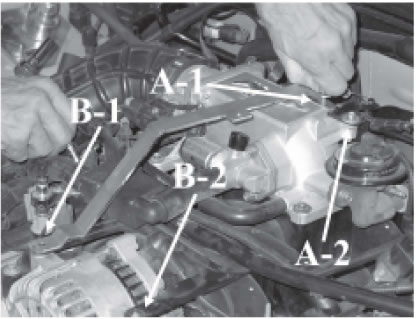
- Attach the first mounting bracket as shown below. The alternator bolt is replaced with the ball stud and the bolt on the throttle body is reused. Be sure to use loctite on the threads.
Note: Do not over tighten ball studs! I accidentally sheared one off. Torque to 40 inch pounds.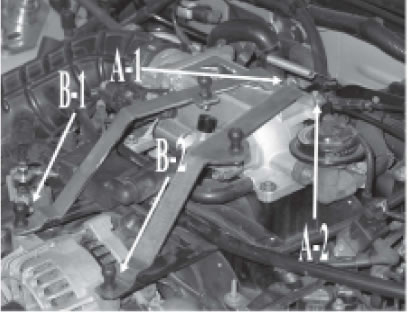
- Attach the second bracket next to the first, again replacing the alternator bolt with the ball stud and reusing the throttle body bolt.
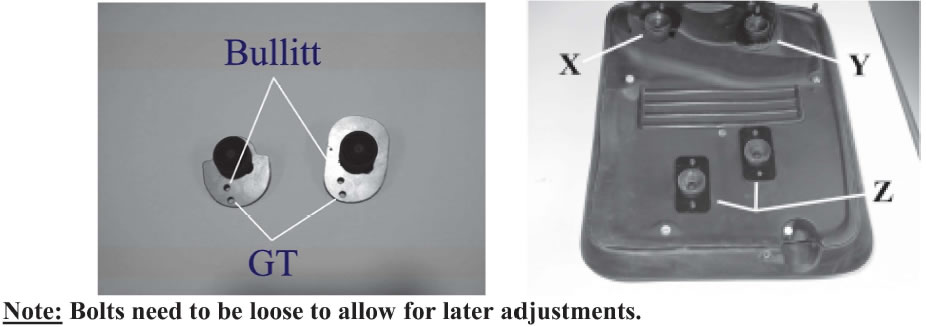
- Install the ball stud brackets to lower air box by hand tightening for now.
Note the mounting location for the front brackets.
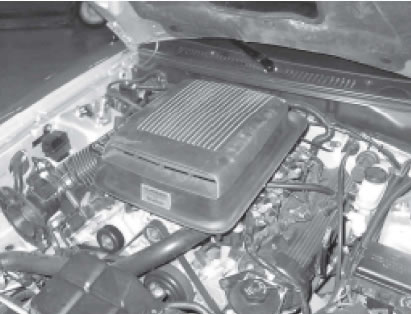
- Press lower air box onto ball studs. Set upper air box and shaker scoop loosely on top of lower air box and close hood.
- Center the scoop in hood. Once centered, remove just the shaker scoop and tighten the mounting brackets.
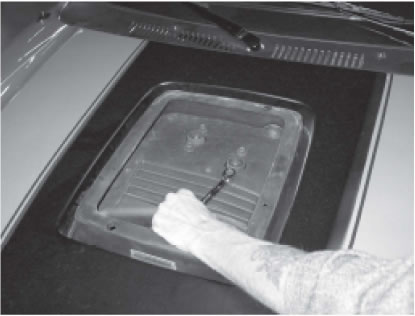
- Open hood and remove entire shaker assembly.
- Attach shaker scoop to upper air box first. Use loctite.
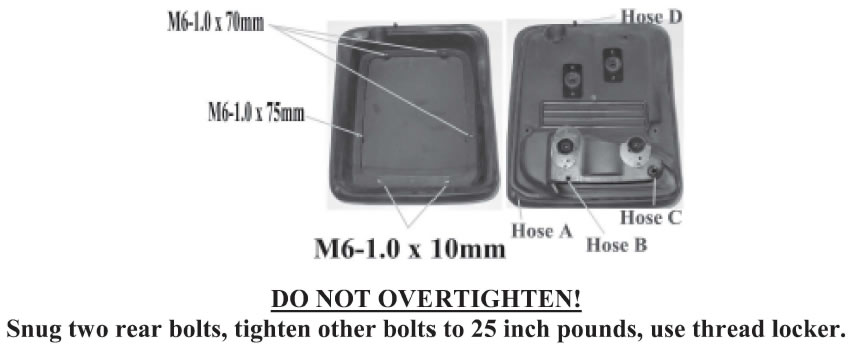
- Then attach lower air box, again using loctite.
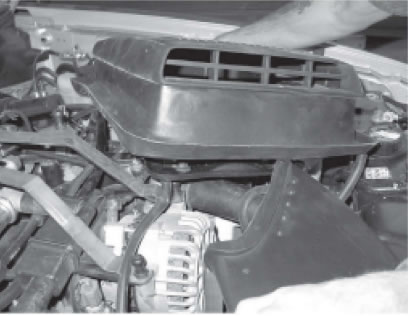
- Install air filter housing back in place.
- Slide shaker assembly over air tube before snapping it onto ball studs.
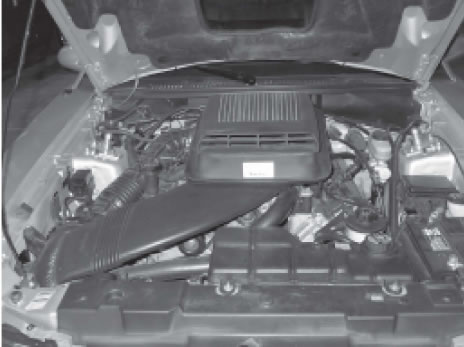
- Attach drain tubes with zip ties. Make sure to route them away from engine.
- Close the hood and you’re ready to go.
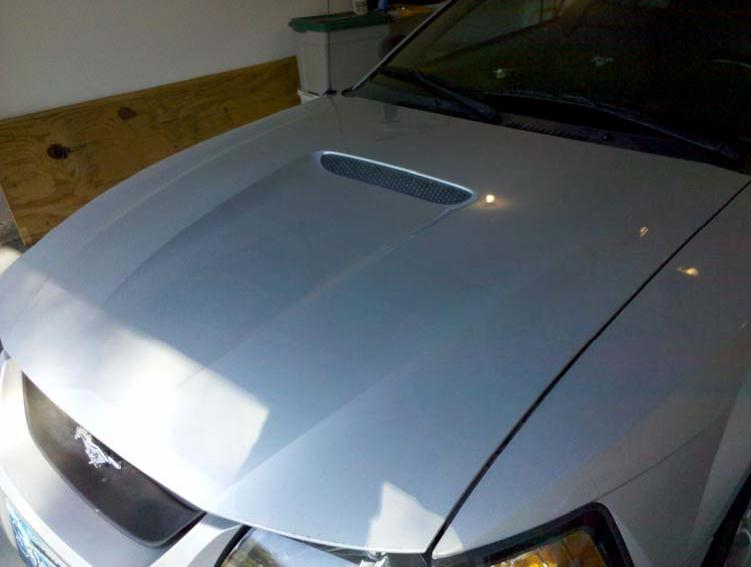
Before
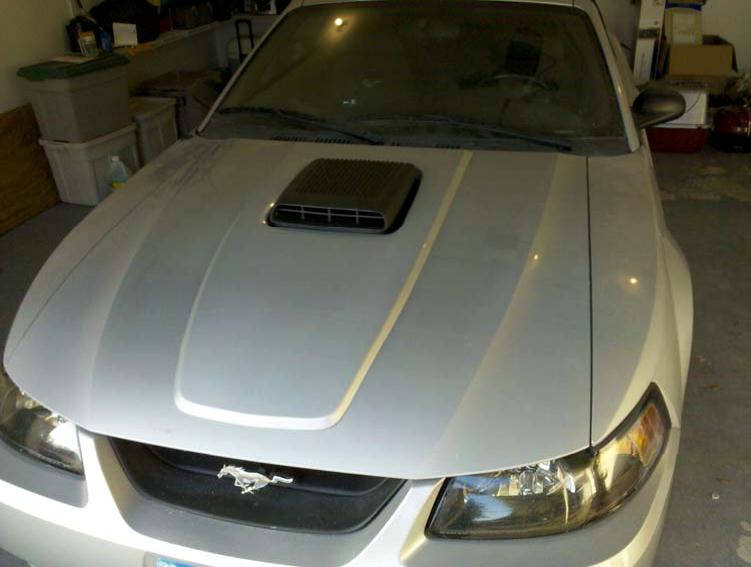
After
Continue Shopping
- Shop all Classic Design Concepts (CDC) Mustang Parts
- Shop all 99-04 Mustang Shaker Systems
- Shop all 99-04 Mustang Engine Parts
Dylan I.
Nathaniel F.
Charles M
William L
Benjamin T
Johann S
Warren M
Ronald M
Jim G
Kristen H
Michael N
Jaime C
Alex G
Stacey H
Richard S
Josh W
Ricky I
Phillipe D
Greg W
Erin O
Dustin P
Heather W
Deborah L
Anthony A
Kenny O
Chris G
Bruce C
Kelvin A
Ronald H
Brian T
Anthony E
Daniel B
Ricky I
Linda W
Michael M
Emir H
Doug B
Chris G
Louis D
William S
Stefan O
Johnny B
James J
Noah B
Mac S
Richard M
Dennis S
Noah B
Richard M
Eric J
Michael A
Spencer T
Robert R
Sara A
William B
Erik S
James R
Kary K
John N
Emir H
Jonathan B
Sherry C
Josh W
William N.
Stratis R
Leo S
Joseph W
James C
George Y
Stephen C
David L
Richard A
Charles M
Albert B
Kyle P
Jim W
Walt S
Ronald B
Stephen H
Carlos G
Paul C
Aaron W
Robert S
Valerie J
Richard A
Ernesto C
Robert R
Steven T
Greg M
Jordan C
Ryan D.Customer Support
I grew up a Chevy kid, but when it came time to get a muscle car of my own, I fell in love with Mustangs. Been bleeding blue ever since. Being a Customer Service Rep at American Muscle lets me talk about the cars I love and how to make...
DaveTraining Director
I have been toying with Mustangs since before a driver's license was even an option. I've owned somewhere around 15 and I'm not done by a long shot. It all started with a 175 HP pearl white convertible Fox Body. It sparked my love for Mustang's and that sparked a...
BillCustomer Support
I'm currently a student at Penn State University studying political science. I've run a performance shop on the side for over a year now, and I've been working on cars for 7 years now. I've done transmissions, engines, and suspensions on many different cars. I used to be a Chevy...
GerryCustomer Support
When I retired after working for the city of Philadelphia and Septa I decided it was time to relive my earlier years and buy a real muscle car. (I also took on this job at AmericanMuscle for fun - I love the car and the community and belong to several...
KarenCustomer Support
I am a Mustangaholic. Do not try to cure me, I am perfectly OK with being one. I have owned over 10 Mustangs in my lifetime already. I currently have just 5 (I did own 8 at one time). I fell in love for the first time when I was...
DuncanMarketing
Got into cars when I was young. Always was into the Mustangs because of the movie 'Gone in 60 Seconds' with the 1967 Shelby GT500 Fast back when I was growing up. I am currently attending Universal Technical Institute for Automotive/Diesel and Ford Fact program. I just started working at...
DannBama Tuning Specialist
I may be the only person to ever brave a winter with drag radials on a Mustang, while still daily driving it. Don’t worry, I finally got them off in the spring (day late and a dollar short, right?), and I promptly finished those tires at our company picnic in...
CraigProduct Development
I have always been around Mustangs in my professional life, either fixing them as a mechanic, selling them at dealerships, or modding them here at AmericanMuscle. Instead of starting right away with the power mods, I started looking more into suspension and weight reduction. I have always dreamed of entering...
LeeCustomer Support
I am a diehard Mustang fanatic. I first fell in love with Mustangs when I was 15 years old and I found a 1966 Mustang coupe restoration project. That was the beginning of my addiction. I quickly added a 1993 Mustang LX 5.0 to my collection which served as my...
JamieCustomer Support
This whole story starts when I was 15 and I had to have a foxbody. So I went out and found the loudest fastest foxbody that 5 grand could buy. When I realized that this thing was a certain death trap I sold it and moved onto the 2000 GT...
HeatherCustomer Support - Lead
I went to automotive school in Exton, PA, and worked as a mechanic for a while. My dad is a huge Ford guy; he used to drag race and my uncles raced motorcycles so I was always in the garage growing up. Working here is nice because it's not as...
Ryan MBama Tuning Specialist
I got my first Mustang when I was 16, a two tone 91 GT red and silver with a sunroof that didn’t leak! And needless to say I was a bit timid to do work on it, I hadn’t modified any vehicle before outside of installing a CD player. I...
DrewCustomer Support
Recently I bought my first home, the selling point for the house was not the amount of land, bedrooms, or bathrooms like how most people would choose a home. I made my choice based on the garage where the mustang sleeps. The garage is completely finished with painted floors, walls,...
Mike JCustomer Support - Manager
My first car was a 1989 Ford Mustang Saleen Convertible that I used as my test car to learn about working on Mustangs. Foxbodies have become my passion and now I pretty much consider myself a Foxbody expert. My dream project car is a Foxbody with a 03-04 cobra swap...
KarenCustomer Support
I am a Mustangaholic. Do not try cure me, I am perfectly ok with being one. I have owned over 10 Mustangs in my lifetime already. I currently have just 5 (I did own 8 at one time). I fell in love for the first time when I was 13....
BrickPurchasing
I was a customer first - 7 years ago I came in to buy parts, got in an argument with someone about a part, and won. I left with my parts and a new job and I've been here ever since. I knew when I came to work at AmericanMuscle,...
JeffMarketing
I've loved Mustangs for as long as I can remember. My dad was a Camaro guy growing up, but his first work truck was a Ford, and we've been a Ford-only family ever since. My dad is a sheet metal worker/mechanic, so everything I know about my car I learned...
DanCustomer Support
All my other cars were all-wheel drive, my brother had an 04 cobra and i wanted to compete and beat him with naturally aspirated so i went with a mach1 - and beat him. Now he works here too! I got lucky and was able to find one of the...
SandyOperations
I have only driven 2 manual transmission Mustangs, the 1st was the car that taught me how to drive stick shift. The other is my current daily driver. A very memorable moment about my GT500 happened when I purchased a JLT CAI and SCT tuner. I thought the car was...
KarenCustomer Support
I am a Mustangaholic. Do not try cure me, I am perfectly ok with being one. I have owned over 10 Mustangs in my lifetime already. I currently have just 5 (I did own 8 at one time). I fell in love for the first time when I was 13....
Chris RMarketing
I was raised by a car family. Drag racing and the Ford blue oval were always a huge part of our household. During my high school years, working on cars and participa....err watching street races probably helped further pull my focus from my priorities and I was hooked. After high-school...
LeeCustomer Support
I am a diehard Mustang fanatic. I first fell in love with Mustangs when I was 15 and I found a 1966 Mustang coupe restoration project. That was the beginning of my addiction. When it came time for my wife to get a new car, she had already driven my...
MikeLead Calibrator & Ford Performance Expert
I’ve had 18 Mustangs, ranging from a stock 66 coupe to a low 9-second Fun Ford Weekend” Street Renegade 96 GT that made 888 RWHP. (308 cid motor, Edelbrock heads, intake and topped off with a Paxton Novi 2000R supercharger pushing 30 psi of boost). My best pass in that...
BrianContent Development
Mustangs hold a special place in my heart. My father owned a 65 mustang when he was younger, but a friend wrecked it. The grille pony still sits on his workbench. Until getting my own pony, I had no clue why he would keep a metal horse for so long....
JamieCustomer Support
This whole story starts when I was 15 and I had to have a foxbody. So I went out and found the loudest fastest foxbody that 5 grand could buy. When I realized that this thing was a certain death trap I sold it and moved onto the 2000 GT...
GerryCustomer Support
When I retired after working for the city of Philadelphia and Septa I decided it was time to relive my earlier years and buy a real muscle car. (I also took on this job at AmericanMuscle for fun - I love the car and the community and belong to several...
EthanInventory Control
I've worked here for 3 years now and done pretty much everything in the warehouse from mounting and balancing wheels/tires, driving the forklift, shipping, and receiving. Both my brothers worked here in other departments, keeping it in the family! My car philosophy's pretty simple, I just want to get where...
EXPLORE
CUSTOMER SERVICE
Sign up for Exclusive Deals & Offers
Connect


