- Shop All
- Sales & Specials
- Accessories
- Body Kits
- Brakes
- Drivetrain
- Engine
- Air, Oil & Fuel Filters
- Mass Air Flow Meters/Sensors
- Alternators
- Motor Mounts
- Batteries
- Nitrous Kits
- Camshafts
- Oil Pans
- Cold Air Intakes
- Radiators, Hoses & Accessories
- Coyote Engine Conversion Parts
- Reservoirs & Tanks
- Crate Engines & Blocks
- Serpentine Belts
- Cylinder Heads & Valvetrain
- Shaker Systems
- Engine Dressup
- Superchargers
- Fender Covers
- Throttle Bodies
- Fuel Delivery
- Turbochargers
- Gaskets
- Underdrive Pulleys
- HVAC Parts
- Valves, Sensors & Sending Units
- Ignition Parts
- Water Pumps & Accessories
- Intake Manifolds & Plenums
- Exhaust
- Exterior
- Antennas
- Hoods
- Body Kits
- License Plates & Frames
- Bras
- Light Covers
- Bumper Inserts
- Lightbars & Styling Bars
- Caliper Covers & Paint
- Louvers
- Car Covers
- Mud Flaps
- Chin Spoilers
- Mirrors & Mirror Covers
- Convertible Top Parts
- Paint & Headlight Protection Film
- Decals
- Pre-painted Parts
- Decklid Panels
- Racing Stripes
- Door Handles, Covers & Bezels
- Scoops
- Emblems & Badges
- Spoilers
- Exterior Trim
- Taillight Trim/Bezels
- Fuel Doors
- Wheel Accessories
- Grilles
- Wind Deflectors
- Hood Pin Kits
- Window Tint & Light Tint
- Intake
- Interior
- Lights
- Restoration
- Suspension
- Tires
- Tuners
- Wheels
- 2010-2013
- Sales & Specials
- Accessories
- Body Kits
- Brakes
- Drivetrain
- Engine
- Air, Oil & Fuel Filters
- Mass Air Flow Meters/Sensors
- Alternators
- Motor Mounts
- Batteries
- Nitrous Kits
- Camshafts
- Radiators, Hoses & Accessories
- Cold Air Intakes
- Reservoirs & Tanks
- Cylinder Heads & Valvetrain
- Shaker Systems
- Engine Dressup
- Superchargers
- Fender Covers
- Throttle Bodies
- Fuel Delivery
- Turbochargers
- Gaskets & Seals
- Underdrive Pulleys
- HVAC Parts
- Valves, Sensors & Sending Units
- Ignition Parts
- Water Pumps & Accessories
- Intake Manifolds & Plenums
- Exhaust
- Exterior
- Antennas
- Hoods
- Bras
- License Plates & Frames
- Caliper Covers
- Light Bars & Convertible Styling Bars
- Car Covers
- Louvers
- Chin Spoilers
- Mirrors & Mirror Covers
- Convertible Top Parts
- Mud Flaps
- Decals & Stripes
- Paint & Headlight Protection Film
- Decklid Panels
- Pre-Painted Parts
- Door Handles, Covers & Bezels
- Racing Stripes
- Emblems & Badges
- Scoops
- Exterior Trim
- Spoilers & Wings
- Fuel Doors
- Taillight Trim
- Grilles
- Wheel Accessories
- Hood Pins & Kits
- Window Tint & Light Tint
- Intake
- Interior
- Lights
- Restoration
- Suspension
- Tires
- Tuners
- Wheels
- 2005-2009
- Sales & Specials
- Accessories
- Body Kits
- Brakes
- Drivetrain
- Engine
- Air, Oil & Fuel Filters
- Mass Air Flow Meters/Sensors
- Alternators
- Motor Mounts
- Batteries
- Nitrous Kits
- Camshafts
- Radiators, Hoses & Accessories
- Cold Air Intakes
- Reservoirs & Tanks
- Cylinder Heads & Valvetrain
- Shaker Systems
- Engine Dressup
- Superchargers
- Fender Covers
- Throttle Bodies
- Fuel Delivery
- Turbochargers
- Gaskets & Seals
- Underdrive Pulleys
- HVAC Parts
- Valves, Sensors & Sending Units
- Ignition Parts
- Water Pumps & Accessories
- Intake Manifolds & Plenums
- Exhaust
- Exterior
- Antennas
- Hoods
- Bras
- License Plates & Frames
- Caliper Covers
- Light Bars & Convertible Styling Bars
- Car Covers
- Louvers
- Chin Spoilers
- Mirrors & Mirror Covers
- Convertible Top Parts
- Mud Flaps
- Decals & Stripes
- Paint & Headlight Protection Film
- Decklid Panels
- Pre-Painted Parts
- Door Handles, Covers & Bezels
- Racing Stripes
- Emblems & Badges
- Scoops
- Exterior Trim
- Spoilers & Wings
- Fuel Doors
- Taillight Trim
- Grilles
- Wheel Accessories
- Hood Pins & Kits
- Window Tint & Light Tint
- Intake
- Interior
- Lights
- Restoration
- Suspension
- Tires
- Tuners
- Wheels
- 1999-2004
- Sales & Specials
- Accessories
- Body Kits
- Brakes
- Drivetrain
- Engine
- Air, Oil & Fuel Filters
- Motor Mounts
- Alternators
- Nitrous Kits
- Batteries
- Oil Pans
- Camshafts
- Radiators, Hoses & Accessories
- Cold Air Intakes
- Replacement Serpentine Belts
- Cylinder Heads & Valvetrain
- Reservoirs & Tanks
- Engine Dressup
- Shaker Systems
- Fender Covers
- Superchargers
- Fuel Delivery
- Throttle Bodies
- Gaskets & Seals
- Turbochargers
- HVAC Parts
- Underdrive Pulleys
- Ignition Parts
- Valves, Sensors & Sending Units
- Intake Manifolds & Plenums
- Water Pumps & Accessories
- Mass Air Flow Meters/Sensors
- Exhaust
- Exterior
- Antennas
- Hood Pins
- Bras
- Hoods
- Bumper Inserts
- License Plates & Frames
- Caliper Covers
- Lightbars & Styling Bars
- Car Covers
- Louvers
- Chin Spoilers
- Mirrors & Mirror Covers
- Convertible Top Parts
- Mud Flaps
- Decals
- Racing Stripes
- Decklid Panels
- Scoops
- Door Handles, Covers & Bezels
- Spoilers & Wings
- Emblems & Badges
- Taillight Trim & Bezels
- Exterior Trim
- Wheel Accessories
- Fuel Doors
- Window Tint & Light Tint
- Grilles
- Intake
- Interior
- Lights
- Restoration
- Suspension
- Tires
- Tuners
- Wheels
- 1994-1998
- Sales & Specials
- Accessories
- Body Kits
- Brakes
- Drivetrain
- Engine
- Air, Oil & Fuel Filters
- Mass Air Flow Meters/Sensors
- Alternators
- Motor Mounts
- Batteries
- Nitrous Kits
- Camshafts
- Oil Pans
- Cold Air Intakes
- Radiators, Hoses & Accessories
- Cylinder Heads & Valvetrain
- Replacement Serpentine Belts
- Engine Dressup
- Reservoirs & Tanks
- Fender Covers
- Superchargers
- Fuel Delivery
- Throttle Bodies
- Gaskets & Seals
- Turbochargers
- HVAC Parts
- Underdrive Pulleys
- Ignition Parts
- Valves, Sensors & Sending Units
- Intake Manifolds & Plenums
- Water Pumps & Accessories
- Exhaust
- Exterior
- Antennas
- Hood Pins & Kits
- Bras
- Hoods
- Bumper Inserts
- License Plates & Frames
- Caliper Covers
- Light Bars & Convertible Styling Bars
- Car Covers
- Louvers
- Chin Spoilers
- Mirrors & Mirror Covers
- Convertible Top Parts
- Racing Stripes
- Decals & Stripes
- Scoops
- Door Handles, Covers & Bezels
- Spoilers & Wings
- Emblems & Badges
- Taillight Trim & Bezels
- Exterior Trim
- Wheel Accessories
- Fuel Doors
- Window Tint & Light Tint
- Grilles
- Intake
- Interior
- Lights
- Restoration
- Suspension
- Tires
- Tuners
- Wheels
- 1979-1993
- Sales & Specials
- Accessories
- Body Kits
- Brakes
- Drivetrain
- Engine
- Air, Oil & Fuel Filters
- Mass Air Flow Meters/Sensors
- Alternators
- Motor Mounts
- Batteries
- Nitrous Kits
- Camshafts
- Oil Pans
- Cold Air Intakes
- Radiators, Hoses & Accessories
- Cylinder Heads & Valvetrain
- Replacement Serpentine Belts
- Engine Dressup
- Reservoirs & Tanks
- Fender Covers
- Superchargers
- Fuel Delivery
- Throttle Bodies
- Gaskets & Seals
- Turbochargers
- HVAC Parts
- Underdrive Pulleys
- Ignition Parts
- Valves, Sensors & Sending Units
- Intake Manifolds & Plenums
- Water Pumps & Accessories
- Exhaust
- Exterior
- Antennas
- Hood Pins & Kits
- Bumper Inserts
- Hoods
- Caliper Covers
- License Plates & Frames
- Car Covers
- Light Bars & Convertible Styling Bars
- Convertible Top Parts
- Louvers
- Decals & Stripes
- Mirrors & Mirror Covers
- Door Handles, Covers & Bezels
- Racing Stripes
- Emblems & Badges
- Spoilers & Wings
- Exterior Trim
- Wheel Accessories
- Grilles
- Intake
- Interior
- Lights
- Restoration
- Suspension
- Tires
- Tuners
- Wheels
How to Change Your Mustang's Oil - Tech Guide
Proper Mustang maintenance is the key to enjoying your car over the long term versus having an unreliable clunker thatís a constant headache. Of the maintenance items youíll run into, changing your Mustangís oil ranks at the top of the list. There are plenty of items to consider when it comes to general maintenance, but your engineís oil is its lifeblood. Ignore it too long, and not only will performance suffer, but your engine can suffer permanent damage.
Changing the oil is really a simple process, even for a beginner. Youíre bound to get messy the first few times, but with some experience youíll soon learn how to do it quickly and with minimal mess. There are also a few tips that, once you know them, will help make the process easier and eliminate the mess.
The first step is to swing by your local auto parts store and buy the supplies you need. You can choose synthetic or standard oil. Synthetic tends to be a little more expensive, but has some benefits in regards to longevity. I use synthetic in my GT but since weíre changing the oil in my 17-year olds car for this article, he opted to use standard oil due to his budget. The oil weight you require will be listed in your ownerís manual, as will the exact quantity of oil needed. Make sure you follow the specifications for your size engine, as the manuals are usually written for more than one vehicle. Purchase enough quarts of oil to cover your needs.
In the event you have misplaced your manual, you can download a copy from Ford online using the following link:
Youíll also need a new Mustang oil filter, and the auto parts store can help you find the correct replacement. Iíve always been one to use Motorcraft filters, but there are other brands to choose from as well. Choose by quality, not by price, as youíre relying on the filter to keep your oil clean over the next few thousand miles. So for this Mustang oil change, we have 6 quarts of Valvoline motor oil, as well as a Motorcraft FL-400S oil filter.
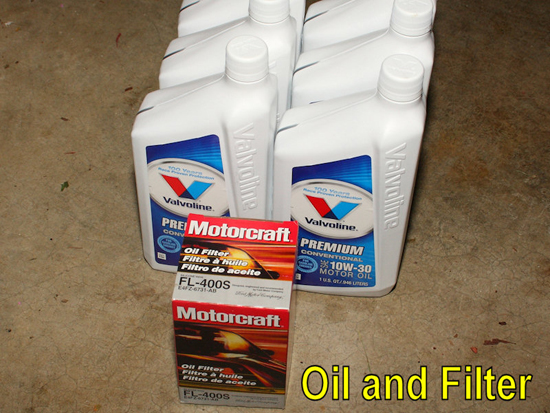
The Mustang Oil Change Process
The tools youíll need are pretty basic, but will vary between engines and model year. Once you change your oil a couple times, youíll know the socket size needed for the drain plug. The first time may require some experimentation with socket sizes however.
Here's a list of what you'll need for installation- Socket (sized to fit oil plug)
- Socket Wrench
- Oil Filter Wrench (Properly sized to fit your filter)
- Drain Pan
- Vehicle Jack
- Jack Stands
- Large Ziplock Bag and Latex Gloves (Optional but reduces mess)
Itís best to change a Mustangís oil when itís warm. So make sure the vehicle has been warmed up before you begin. Warm oil will flow better, helping you to get as much used oil out of the engine as possible. It will also tend to carry any residual sludge out as well, should there be any in the oil passages. Waiting about 15 minutes between shutting the engine off and draining the oil should give sufficient time for the oil to cool enough not to burn you, but still warm enough to flow well. The oil will still be very warm so use caution. Gloves will help during the draining to protect your hands.
Youíll want to jack the car up first, and set it on jack stands. In most cases, youíll find the oil plug towards at the rear of the oil pan. So the car being level isnít really necessary, and you can merely raise the front. Make sure that the rear parking brake is set to prevent the vehicle from moving before you jack it up.
Now remove your engineís oil cap, to further assist the used oil in draining from the engine.

Next locate the drain plug on your Mustangís oil pan. In some cases, such as older 5.0 Mustangs theyíll be two drain plugs, one at the back, and one closer to the middle of the pan. Most other engine configurations will make use of a single oil drain plug.

Position your drain pan under the plug. Then use a socket and socket wrench to loosen the oil drain plug. After itís broken loose, you should be able to spin it by hand.
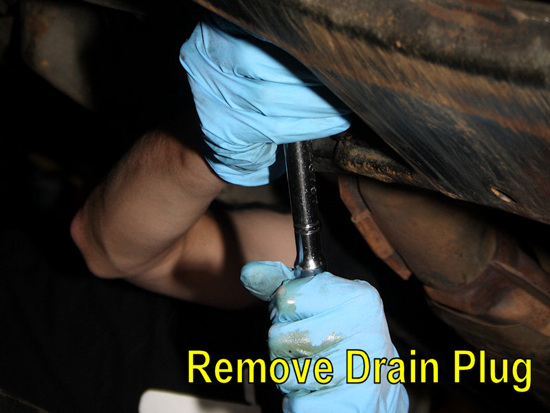
Once the plug is loose, you can quickly move your hand back avoiding the warm oil. Make sure your pan is catching the oil draining from the engine, and adjust it if needed. When the oil has stopped draining, replace the drain plug. Do not over-tighten the plug, thread it in by hand, and then simply snug it up with your socket wrench an 1/8 of a turn or so.
Iíve seen threadlock used for the drain plug before, usually by novices. So I want to point out that you do not want to use threadlock on the drain plug.

Next, youíll focus on the removal of the oil filter. Use your filter wrench to turn it counter-clockwise. For strap-type wrenches, such as whatís used in the picture, position the wrench close to the end of the filter. The filter is strongest at the point, and the ridges help provide better grip for the wrench.
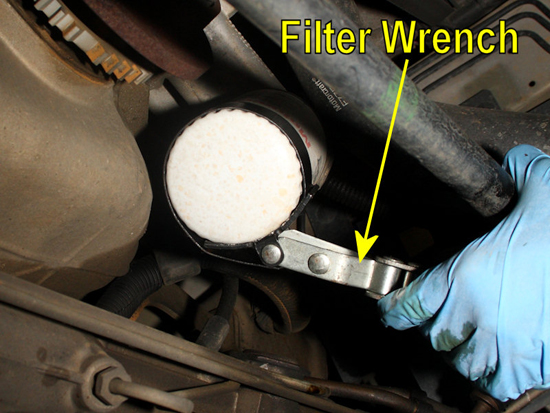
Once youíve loosened the filter, you can spin it off by hand. I like to use a large ziplock bag around the filter to minimize the mess. Place the bag around the filter to help catch any draining oil, keeping it off of the carís chassis, as you remove the filter. In the event you donít use a ziplock bag, position the drain pan under the filter to catch any oil that runs out.
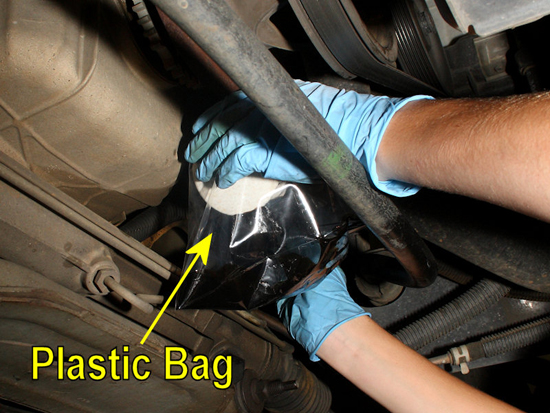
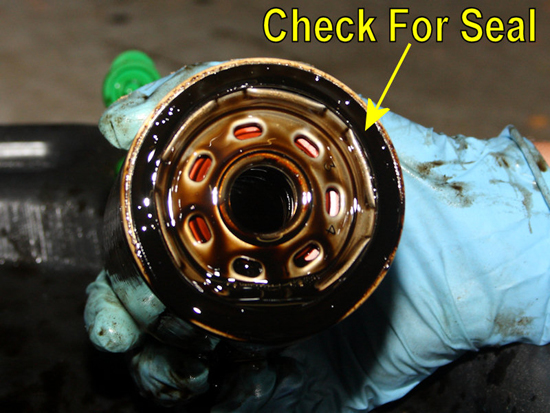
Examine the old filter. Make sure the rubber seal is still attached to the filter. If itís missing, retrieve it from the oil filter mount where you removed the old filter. Your new filter will already have a seal on it, and leaving the old one on the engine will result in an oil leak because the new seal will not seat properly.
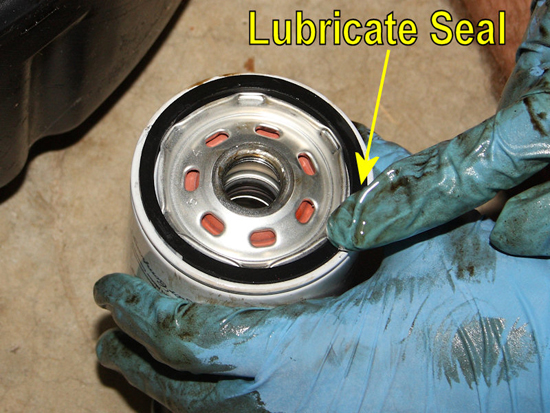
Use a little oil to lubricate the seal on the new oil filter.
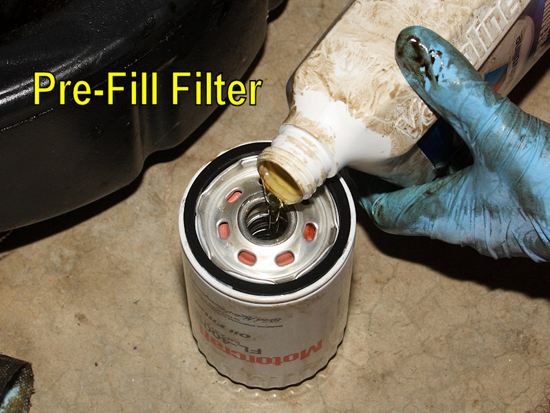
While itís not necessary, I prefer to pre-fill the new filter. This helps to eliminate excess air in the oiling system upon the initial startup. Keep in mind that you may have to tilt the filter some to install it, so you likely wonít be able to fully fill it. Between Ĺ and ĺ full will be fine. Hand-tighten the new filter into place. Then use the filter wrench to snug the filter up between ľ and Ĺ a turn.
Many people donít realize that quarts of oil are designed with the spout off to one side for a reason. Utilize this design to your advantage, and pour the oil properly. Keep the spout towards the top of the bottle, as it allows the quart to be nearly level before oil starts to pour out of it. In most cases, when a quart of oil is poured in the correct manner, thereís no need for a funnel.
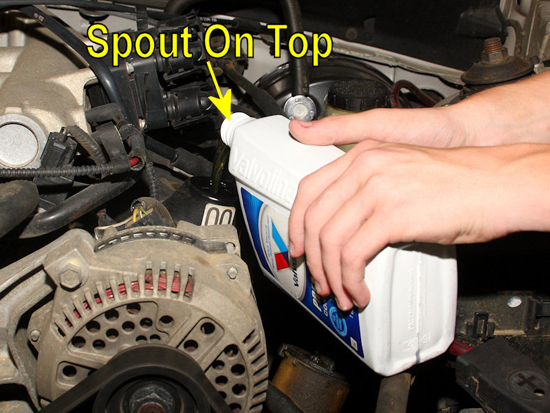
You can go ahead and pour several quarts of oil into the engine. Stop about a quart shy of what your manual listed as the capacity, as some of the used oil will always remain in the engine. You donít want to overfill the engine with oil. Wait a few minutes to allow the oil to flow to the bottom of the engine, and then check the oil using the dipstick. Remove the dipstick, wipe it off, then return it to the tube, and pull it out again. You should see a trail of oil on the dipstick, indicating the oil level.
Usually the target level is indicated by crosshatching, as well as a couple of holes. Youíll want the oil to fall between these two marks. If the oil is still low, add some more oil, wait a few minutes, and then check the level again. Repeat as necessary, and then replace the oil cap.
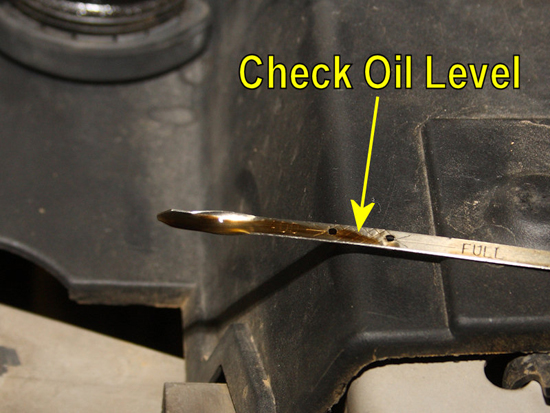
After the oil level is correct, start the engine up. Check to ensure that your oil pressure gauge indicates oil pressure, and that you see no leaks under the car. Itís a good idea to check your oil again after the first drive on a new Mustang oil change. As the filter fills completely up with oil, you may find that the oil level needs to be topped off again. Make sure to make a note of your mileage, and change your oil again at the next recommended interval.
Dylan I.
Nathaniel F.
Charles M
William L
Benjamin T
Johann S
Warren M
Ronald M
Jim G
Kristen H
Michael N
Jaime C
Alex G
Stacey H
Richard S
Josh W
Ricky I
Phillipe D
Greg W
Erin O
Dustin P
Heather W
Deborah L
Anthony A
Kenny O
Chris G
Bruce C
Kelvin A
Ronald H
Brian T
Anthony E
Daniel B
Ricky I
Linda W
Michael M
Emir H
Doug B
Chris G
Louis D
William S
Stefan O
Johnny B
James J
Noah B
Mac S
Richard M
Dennis S
Noah B
Richard M
Eric J
Michael A
Spencer T
Robert R
Sara A
William B
Erik S
James R
Kary K
John N
Emir H
Jonathan B
Sherry C
Josh W
William N.
Stratis R
Leo S
Joseph W
James C
George Y
Stephen C
David L
Richard A
Charles M
Albert B
Kyle P
Jim W
Walt S
Ronald B
Stephen H
Carlos G
Paul C
Aaron W
Robert S
Valerie J
Richard A
Ernesto C
Robert R
Steven T
Greg M
Jordan C
Ryan D.Customer Support
I grew up a Chevy kid, but when it came time to get a muscle car of my own, I fell in love with Mustangs. Been bleeding blue ever since. Being a Customer Service Rep at American Muscle lets me talk about the cars I love and how to make...
DaveTraining Director
I have been toying with Mustangs since before a driver's license was even an option. I've owned somewhere around 15 and I'm not done by a long shot. It all started with a 175 HP pearl white convertible Fox Body. It sparked my love for Mustang's and that sparked a...
BillCustomer Support
I'm currently a student at Penn State University studying political science. I've run a performance shop on the side for over a year now, and I've been working on cars for 7 years now. I've done transmissions, engines, and suspensions on many different cars. I used to be a Chevy...
GerryCustomer Support
When I retired after working for the city of Philadelphia and Septa I decided it was time to relive my earlier years and buy a real muscle car. (I also took on this job at AmericanMuscle for fun - I love the car and the community and belong to several...
KarenCustomer Support
I am a Mustangaholic. Do not try to cure me, I am perfectly OK with being one. I have owned over 10 Mustangs in my lifetime already. I currently have just 5 (I did own 8 at one time). I fell in love for the first time when I was...
DuncanMarketing
Got into cars when I was young. Always was into the Mustangs because of the movie 'Gone in 60 Seconds' with the 1967 Shelby GT500 Fast back when I was growing up. I am currently attending Universal Technical Institute for Automotive/Diesel and Ford Fact program. I just started working at...
DannBama Tuning Specialist
I may be the only person to ever brave a winter with drag radials on a Mustang, while still daily driving it. Donít worry, I finally got them off in the spring (day late and a dollar short, right?), and I promptly finished those tires at our company picnic in...
CraigProduct Development
I have always been around Mustangs in my professional life, either fixing them as a mechanic, selling them at dealerships, or modding them here at AmericanMuscle. Instead of starting right away with the power mods, I started looking more into suspension and weight reduction. I have always dreamed of entering...
LeeCustomer Support
I am a diehard Mustang fanatic. I first fell in love with Mustangs when I was 15 years old and I found a 1966 Mustang coupe restoration project. That was the beginning of my addiction. I quickly added a 1993 Mustang LX 5.0 to my collection which served as my...
JamieCustomer Support
This whole story starts when I was 15 and I had to have a foxbody. So I went out and found the loudest fastest foxbody that 5 grand could buy. When I realized that this thing was a certain death trap I sold it and moved onto the 2000 GT...
HeatherCustomer Support - Lead
I went to automotive school in Exton, PA, and worked as a mechanic for a while. My dad is a huge Ford guy; he used to drag race and my uncles raced motorcycles so I was always in the garage growing up. Working here is nice because it's not as...
Ryan MBama Tuning Specialist
I got my first Mustang when I was 16, a two tone 91 GT red and silver with a sunroof that didnít leak!† And needless to say I was a bit timid to do work on it, I hadnít modified any vehicle before outside of installing a CD player.† I...
DrewCustomer Support
Recently I bought my first home, the selling point for the house was not the amount of land, bedrooms, or bathrooms like how most people would choose a home. I made my choice based on the garage where the mustang sleeps. The garage is completely finished with painted floors, walls,...
Mike JCustomer Support - Manager
My first car was a 1989 Ford Mustang Saleen Convertible that I used as my test car to learn about working on Mustangs. Foxbodies have become my passion and now I pretty much consider myself a Foxbody expert. My dream project car is a Foxbody with a 03-04 cobra swap...
KarenCustomer Support
I am a Mustangaholic. Do not try cure me, I am perfectly ok with being one. I have owned over 10 Mustangs in my lifetime already. I currently have just 5 (I did own 8 at one time). I fell in love for the first time when I was 13....
BrickPurchasing
I was a customer first - 7 years ago I came in to buy parts, got in an argument with someone about a part, and won. I left with my parts and a new job and I've been here ever since. I knew when I came to work at AmericanMuscle,...
JeffMarketing
I've loved Mustangs for as long as I can remember. My dad was a Camaro guy growing up, but his first work truck was a Ford, and we've been a Ford-only family ever since. My dad is a sheet metal worker/mechanic, so everything I know about my car I learned...
DanCustomer Support
All my other cars were all-wheel drive, my brother had an 04 cobra and i wanted to compete and beat him with naturally aspirated so i went with a mach1 - and beat him. Now he works here too! I got lucky and was able to find one of the...
SandyOperations
I have only driven 2 manual transmission Mustangs, the 1st was the car that taught me how to drive stick shift. The other is my current daily driver. A very memorable moment about my GT500 happened when I purchased a JLT CAI and SCT tuner. I thought the car was...
KarenCustomer Support
I am a Mustangaholic. Do not try cure me, I am perfectly ok with being one. I have owned over 10 Mustangs in my lifetime already. I currently have just 5 (I did own 8 at one time). I fell in love for the first time when I was 13....
Chris RMarketing
I was raised by a car family. Drag racing and the Ford blue oval were always a huge part of our household. During my high school years, working on cars and participa....err watching street races probably helped further pull my focus from my priorities and I was hooked. After high-school...
LeeCustomer Support
I am a diehard Mustang fanatic. I first fell in love with Mustangs when I was 15 and I found a 1966 Mustang coupe restoration project. That was the beginning of my addiction. When it came time for my wife to get a new car, she had already driven my...
MikeLead Calibrator & Ford Performance Expert
Iíve had 18 Mustangs, ranging from a stock 66 coupe to a low 9-second Fun Ford WeekendĒ Street Renegade 96 GT that made 888 RWHP. (308 cid motor, Edelbrock heads, intake and topped off with a Paxton Novi 2000R supercharger pushing 30 psi of boost). My best pass in that...
BrianContent Development
Mustangs hold a special place in my heart. My father owned a 65 mustang when he was younger, but a friend wrecked it. The grille pony still sits on his workbench. Until getting my own pony, I had no clue why he would keep a metal horse for so long....
JamieCustomer Support
This whole story starts when I was 15 and I had to have a foxbody. So I went out and found the loudest fastest foxbody that 5 grand could buy. When I realized that this thing was a certain death trap I sold it and moved onto the 2000 GT...
GerryCustomer Support
When I retired after working for the city of Philadelphia and Septa I decided it was time to relive my earlier years and buy a real muscle car. (I also took on this job at AmericanMuscle for fun - I love the car and the community and belong to several...
EthanInventory Control
I've worked here for 3 years now and done pretty much everything in the warehouse from mounting and balancing wheels/tires, driving the forklift, shipping, and receiving. Both my brothers worked here in other departments, keeping it in the family! My car philosophy's pretty simple, I just want to get where...
EXPLORE
CUSTOMER SERVICE
Sign up for Exclusive Deals & Offers
Connect


